Galaksija: Difference between revisions
No edit summary |
|||
| (45 intermediate revisions by the same user not shown) | |||
| Line 3: | Line 3: | ||
|Picture=Galaksija 1984.jpg | |Picture=Galaksija 1984.jpg | ||
|Omschrijving=An extremely simple "homecomputer" from former Yugoslavia | |Omschrijving=An extremely simple "homecomputer" from former Yugoslavia | ||
|Status= | |Status=Stalled | ||
|Contact=Mahjongg | |Contact=Mahjongg | ||
}} | }} | ||
| Line 10: | Line 10: | ||
this encounter re-sparked my interest, and I did some research. Previously I had heard that it was no longer possible to build a Galaksija because the original used some undocumented special behaviour of the original Z80's that modern Z80 CPU's no longer have. | this encounter re-sparked my interest, and I did some research. Previously I had heard that it was no longer possible to build a Galaksija because the original used some undocumented special behaviour of the original Z80's that modern Z80 CPU's no longer have. | ||
The original Galaksija was amazingly simple, even simpler than a ZX80, when I first saw its schematic I could not believe it could work, but I had seen some (youtube) video's with the Galaksija running BASIC, and | The original Galaksija was amazingly simple, even simpler than a ZX80, when I first saw its schematic I could not believe it could work, but I had seen some (youtube) video's with the Galaksija running BASIC, and its screen and font looked very nice an clean and well formed. But except for the Z80 some ROM and RAM chips it used just 12 simple Low power Schottky TTL chips. | ||
Alas, there was no hope you could build one with current technology, but there were some rumours about a "CMOS" version, that was said to be working with modern schematics, and I had seen another Schematic of an unmarked "Galaksija computer" that used one programmable GAL chip, and 74LS logic, but almost no other information was available about it, and the content of the GAL was not described, which made replication this version impractical, there was also no info if this version would work with a modern Z80. | Alas, there was no hope you could build one with current technology, but there were some rumours about a "CMOS" version, that was said to be working with modern schematics, and I had seen another Schematic of an unmarked "Galaksija computer" that used one programmable GAL chip, and 74LS logic, but almost no other information was available about it, and the content of the GAL was not described, which made replication this version impractical, there was also no info if this version would work with a modern Z80. | ||
| Line 33: | Line 33: | ||
The result is here: [[File:Galaksija project translation.pdf]] | The result is here: [[File:Galaksija project translation.pdf]] | ||
its still a bit rough, and missing many pictures, but with the original .PDF beside it is understandable, it is certainly interesting reading material. | its still a bit rough, and missing many pictures, but with the original .PDF beside it, it is understandable, it is certainly interesting reading material. | ||
I'm currently studying it, to see if it will help me design my own Galaksija clone. | I'm currently studying it, to see if it will help me design my own Galaksija clone. | ||
== saturday february 13 2016 == | |||
Finally I managed to extract a view-able schematic from the .SCH I found, using gEDA and the GIMP and some trial and error. | |||
opening the Schematic with gEDA proved a frustrating result, as the .SCH did not include schematic library elements for any of the logic building blocks, the .SCH opened as just a bunch of interconnects. | |||
However, while using the GIMP to extract a .PNG file from the malformed schematics, I discovered the GIMP showed a full preview of the previously incomplete Galksija schematic, and opening it with the GIMP proved to be a success, unlike the half a dozen other programs I tried before! So no I have the full schematic of CMOS Galaksija! | |||
Here it is! | |||
[[File:Galaksija schematic.png|1800px]] | |||
I'm studying it now | |||
It looks simple enough, but compared to the original schematic as first published it a bit more involved. In fact the first schematic looks ridiculously simple, and it even includes the keyboard logic. | |||
[[File:Original Galaksija schematic diagram.jpg]] | |||
I also found this version, which is slightly more modern than the original, as it uses a GAL a simple programmable logic device, but gives no definition of the contents of the GAL, making it a puzzle to figure out what the GAL does, it also does not mention if it works with a modern Z80. | |||
[[File:GalaxySCH.pdf]] | |||
I'm planning to bring back the CMOS schematic to its barest simplest form, and build it up on a simple single sided board with nothing but PTH components, for easy build-up, but still more modern than it was. | |||
From that I might add some extensions to the original. | |||
== September 2016 == | |||
Layout work on the ZX81+35, and its PSG means I had to stall this project for now. | |||
== Resume working on it in February 2022 == | |||
After a long time suffering from a strongly deteriorated health due to perhaps covid (But I don't remember having had covid) or perhaps from sitting inside all the time, my Asthma from which I always have suffered, but which was kept manageable with medication, got far worse to the extent that I got sick and could do almost nothing. Luckily in the Netherlands you will get an alimony from the state, and I got some pension money, so financially I could get just by for food and paying my rent. | |||
Now I'm slowly getting better an I decided to find something to do, other than moderating a forum, and doing some freelance repair work at a games museum, so I would become clearer in my head. | |||
So I decided to pick up where I left in 2016, my ZX81+38 clone seems to be working, and continuing my rhococo development is a bit too much for now, so why not create my own take on the Galaksija, which I will baptise "PanGalaksija" to distinguish it from other versions, and to announce this will be a "english" version that will be more modern. read Pan as "worldwide" as in Pandemic. I intend to make it as simple and cheap as possible. | |||
It will be based on the "CMOS Galaksija" so that it can work with modern Z80's, and I will use KiCad to design it. It will use a single dual sided PCB that is as small as is practical. | |||
It will be fed 5V through an USB connector, and will only output PAL composite video, not RF. | |||
It will use a keyboard based on my Rhococo keyboard, but integrated on the same PCB, using the same cheap but adequate keys, with square tops, and stickers for the text on them. | |||
as for the character set, and pseudo graphics, I don't like the separate pixels in the font, I like the TRS-80 style better, and I will try to improve it. It seems to support 128 characters now, so I hope I can add | |||
some game characters and lowercase if possible, I will remove characters specific to Yugoslavian (sorry for that), and will use a single (OTP)ROM and a 32K Static RAM chip, same as my ZX81+38. | |||
== February 11, 2022 Installed KCad 6 on PC at home == | |||
It look took some effort and cleaning up my old 2012 Mac Mini, but I finally managed to get KiCad 6 to work on my main PC at home, so I don't have to use my laptop, and will have a bigger screen to work with. I will first copy some of my KiCad designs to my Mac to see if they are even compatible with the much older KiCad on my linux Laptop. I'm investigating the possibility to have the character ROM in programmable RAM, that would enhance the capabilities for gaming enormously. For the moment I'm still staying with generating a monochrome PAL signal. I don't want to succumb to feature creep, in the interest of simplicity and cheapness, and compatibility. | |||
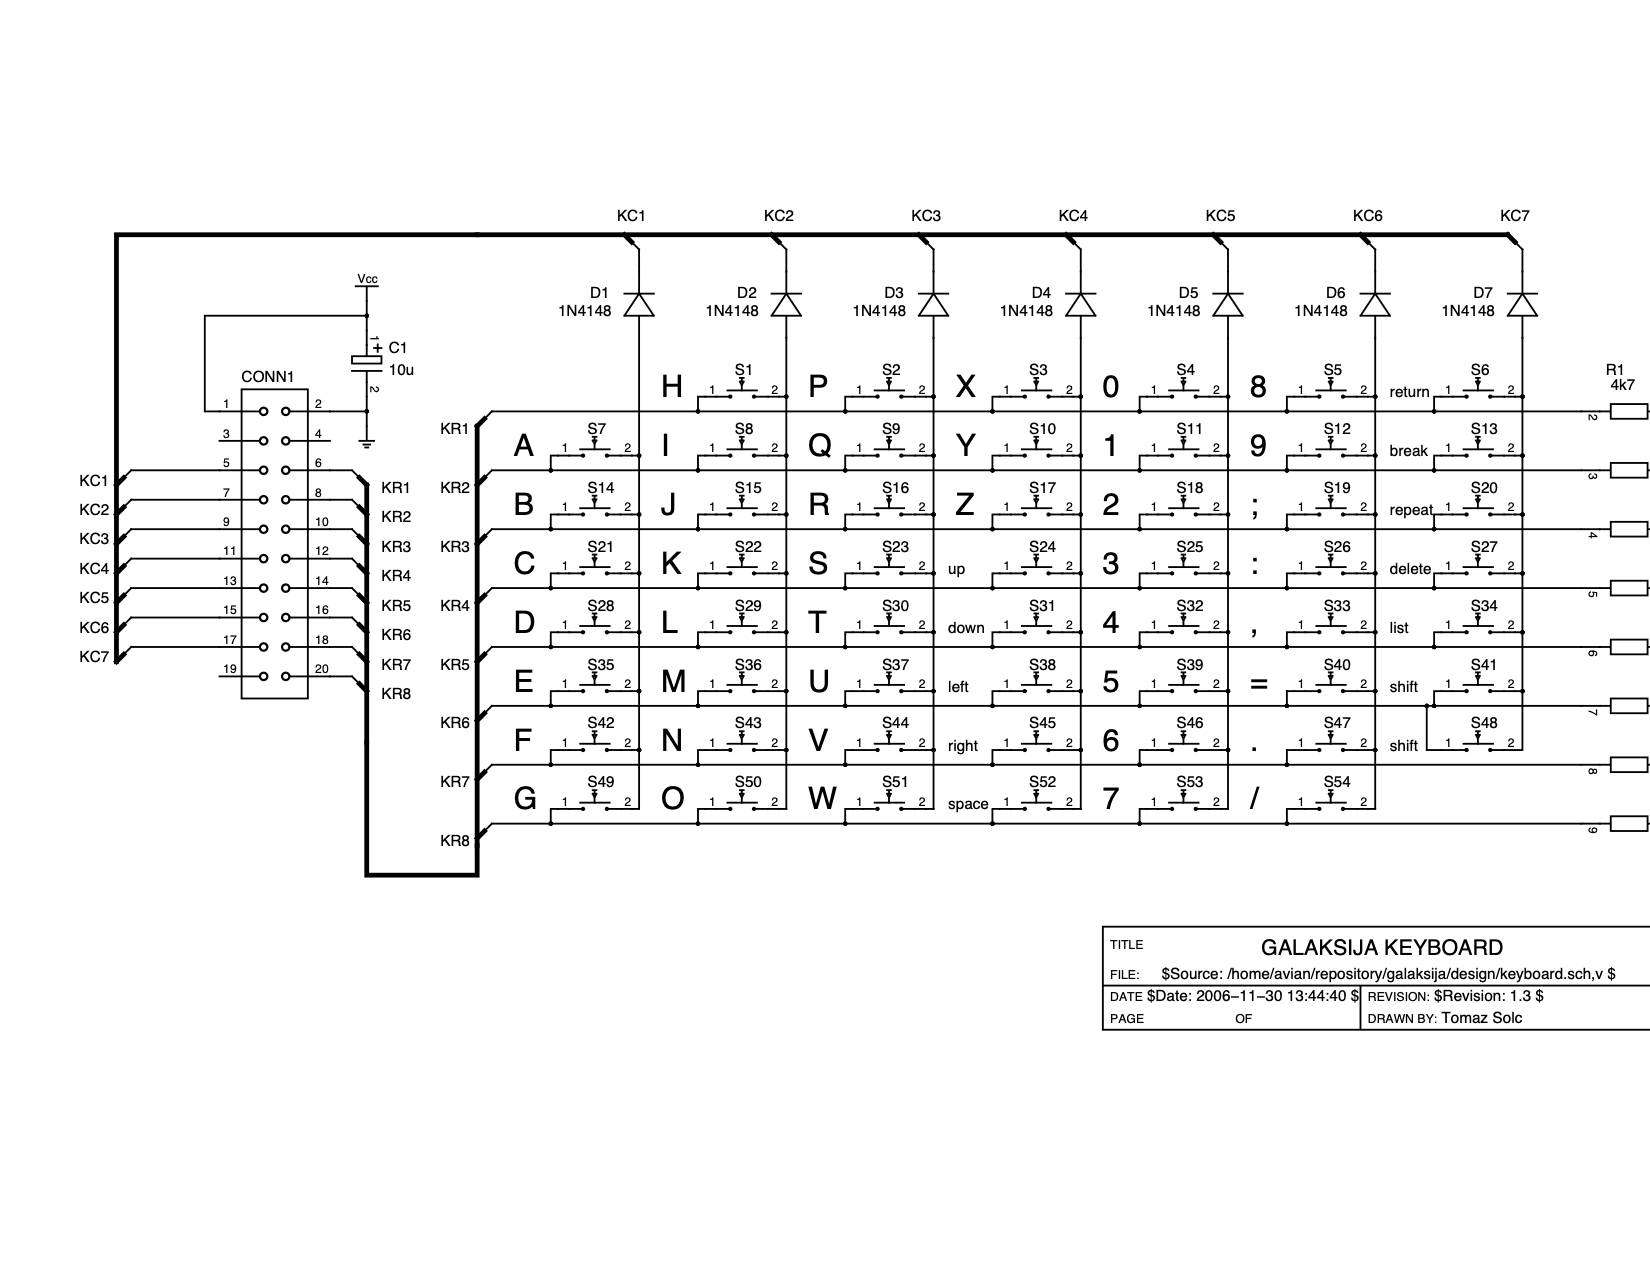
== February 14, Galaksija Keyboard schematic == | |||
I found a clear picture of the keyboard matrix of the Galaksija. | |||
[[File:Galakija Keyboard schematic.png]] | |||
and a typical keyboard layout | |||
[[File:Desktop computer GALAKSIJA, 1983.jpg|1300px]] | |||
== February 16, drawn keyboard schematic and designed placement of keys == | |||
I figured out the schematic of kalaksija's keyboard matrix and entered it in an M3 sheet, I hope the whole schematic will fit on a single sheet. you can preview the schematic of the keyboard here: | |||
[[File:PanGalaksija keyboard schematic preview.pdf]] | |||
I also imported the parts into the KiCAD PCB layout editor, and figured out a correct key placement, which was one hell of a puzzle, but I think I did it without making mistakes, as the enter key is twice as wide as the other keys, I used a second key for the right half, for the spacebar I made a compromise and used three keys, same as the rhococo. So I added new switches in the schematic, and added four new keys to the layout. I captured a picture from KiCad's 3D preview function, as the keys do not (yet) have a 3D shape, you will only see the keyplacemens as the unpopulated PCB would look. | |||
I also figured out that the board outline would be 8.85 inch wide or about 22.5 cm. | |||
== February 17, laid out the keyboard section == | |||
I laid out the keyboard, together with the pullup resistors, and the interface diodes. Red traces on top layer, blue traces on bottom (solder) layer. Note that the red traces between the longer distance pads of the keypad are actually part of the keypad, and are connected inside the key. | |||
[[File:Keyboard PanGalaksija preview.png]] | |||
== February 28, slowly filling in parts in the schematic == | |||
Did most of the 14-pin DIP IC's, but I have a problem with parts I wanted to "borrow" from my Rhococ design, such as the switch, the USB-B connector, and the 3.5mm Audio jacks it seems I designed the footprints of several components myself, and these are therefore not in the common footprint library of KiCad 6.0. I'm still working out how to copy them to the Galaksija design. Its not that I can simply paste the parts into the layout, as the schematic doesn't know how to connect to a part that isn't in the parts library. I hope I don't have to re-create the footprint again for the Galaksija. | |||
My plan now is to just literally copy the CMOS galaksija design, and built that so I have a base that (hopefully) will simply work, after that I can figure out which enhancements I can create. I do want to remove the -5V generator, and use an USB-B connector instead of using the hated barrel connector and an 7805 regulator, so I will change that aspect of CMOS Galaksija, and so I also have to change the composite video output driver as it relies of having -5V. I will also add an on/off switch, and maybe try to add a joystick via keyboard presses interface. these are relatively safe extensions. will add some idea's for extensions as long as they don't interfere with the basic CMOS design. If revision 1 of PanGalaksija is working I can try several idea's I have. | |||
= March 9, schematic revision 1.0 finished, plus placement of components = | |||
Today I finished the schematic of revision 1.0 of PanGalaksija, updated it to the PCB and placed all the components, also imported the earlier routing of the keyboard, including the diodes and pullups, now used a 9-pin resistor network for the pullups. | |||
You can see the full schematic in a .PDF here: [[File:PanGalaksija schematic rev1.0.pdf]] | |||
This is the main section, the keyboard is on a separate sheet. | |||
[[File:PanGalaksija schematic main rev1.0.png]] | |||
This is the keyboard section of PanGalaksija rev 1.0 | |||
[[File:PanGalaksija schematic Keys rev1.0.png]] | |||
This is how the preliminary placement of the PanGalaksija PCB revision 1.0 looks like (note that this placement is strictly preliminary, and can change a lot when the layout makes it necessary. | |||
[[File:PanGalaksija-component placement rev 1.0.pdf]] | |||
and this is the picture: | |||
[[File:PanGalaksija component placing rev1.0 Preliminary.png|1000px]] | |||
Next is finishing the components that have no, or incomplete 3D shapes, so we can create a 3D preview. | |||
== March 15, 2022 suspended working on PanGalaksija for now == | |||
Now that a ZX-81 enthusiast has got the sd-card interface working for my ZX81+35 clone, I suspended work on my PanGalaksija in favour of working on a PSG board with 32K RAM and OTP ROM socket for a real ZX-81 (and for my ZX-81+38 clone) . I will resume to the PanGalaksija afterwards. | |||
Latest revision as of 18:14, 5 April 2022
| Project Galaksija | |
|---|---|
| |
| An extremely simple "homecomputer" from former Yugoslavia | |
| Status | Stalled |
| Contact | Mahjongg |
| Last Update | 2022-04-05 |
During the last Revspace festivity I met a person that was showing off his PIC based VGA "jumping jack" game. Because I'm interested in the technology behind creating a VGA signal with a micro-controller and (almost) no external hardware (I'm planning to do something similar with my RhoCoCo Retro Home Color Computer, and my ZX81 clone also works this way) I asked if he knew a bit about the technical details of the game, and we started talking. When I heard he was from the former Yugoslavia I told him that during my search for a simple computer to re-design, I had considered doing a clone of the Galaksija. he responded that he knew the Galaksija well, and that in fact this jumping jack game was designed by the very same person that designed the Galaksija namely Voja Antonić!
this encounter re-sparked my interest, and I did some research. Previously I had heard that it was no longer possible to build a Galaksija because the original used some undocumented special behaviour of the original Z80's that modern Z80 CPU's no longer have.
The original Galaksija was amazingly simple, even simpler than a ZX80, when I first saw its schematic I could not believe it could work, but I had seen some (youtube) video's with the Galaksija running BASIC, and its screen and font looked very nice an clean and well formed. But except for the Z80 some ROM and RAM chips it used just 12 simple Low power Schottky TTL chips.
Alas, there was no hope you could build one with current technology, but there were some rumours about a "CMOS" version, that was said to be working with modern schematics, and I had seen another Schematic of an unmarked "Galaksija computer" that used one programmable GAL chip, and 74LS logic, but almost no other information was available about it, and the content of the GAL was not described, which made replication this version impractical, there was also no info if this version would work with a modern Z80.
So I gave up on the Galaksija, and after considering some other options decided to make a replicate of the ZX81 because there was plenty of information about it available.
But I never forgot about the Galaksija, and so decided to do some more research. Which was difficult because most information was written in the Slovenian language.
I soon I found out that one Tomaž ŠOLC had designed a "modern clone" "Replika mikroračunalnika Galaksija" for his university thesis, and had done a talk about it during the 29th Chaos Communication Congress, in Hamburg, Germany. in December 2012, so quite recently. This also revealed (without going into detail) that a GAL version also existed, but that the "modern" version was indeed called the "CMOS Galaksija" .
Alas, I could not find a schematic of this "CMOS Galaksija", at least not in a usable (.PDF) form. just a .SCH for which no CAD program was listed, and which no CAD system I owned could open.
I could see from pictures of the board that this Galaksija was different from the original, but the youtube movie of the talk he did made it clear that it would work with a modern Z80.
Not much more info (except for a complete disassembly of Galaksija basic was available. Except there was a long .PDF document written in Slovenian which was his university diploma thesis, filled with an unknown to me language and many intriguing tables and pictures, which probably had all the details about his (assuming successful) clone.
So I simply translated his thesis!
Obviously I used a translating engine, Google Translate, it was one hell of a job.
The result is here: File:Galaksija project translation.pdf
its still a bit rough, and missing many pictures, but with the original .PDF beside it, it is understandable, it is certainly interesting reading material.
I'm currently studying it, to see if it will help me design my own Galaksija clone.
saturday february 13 2016
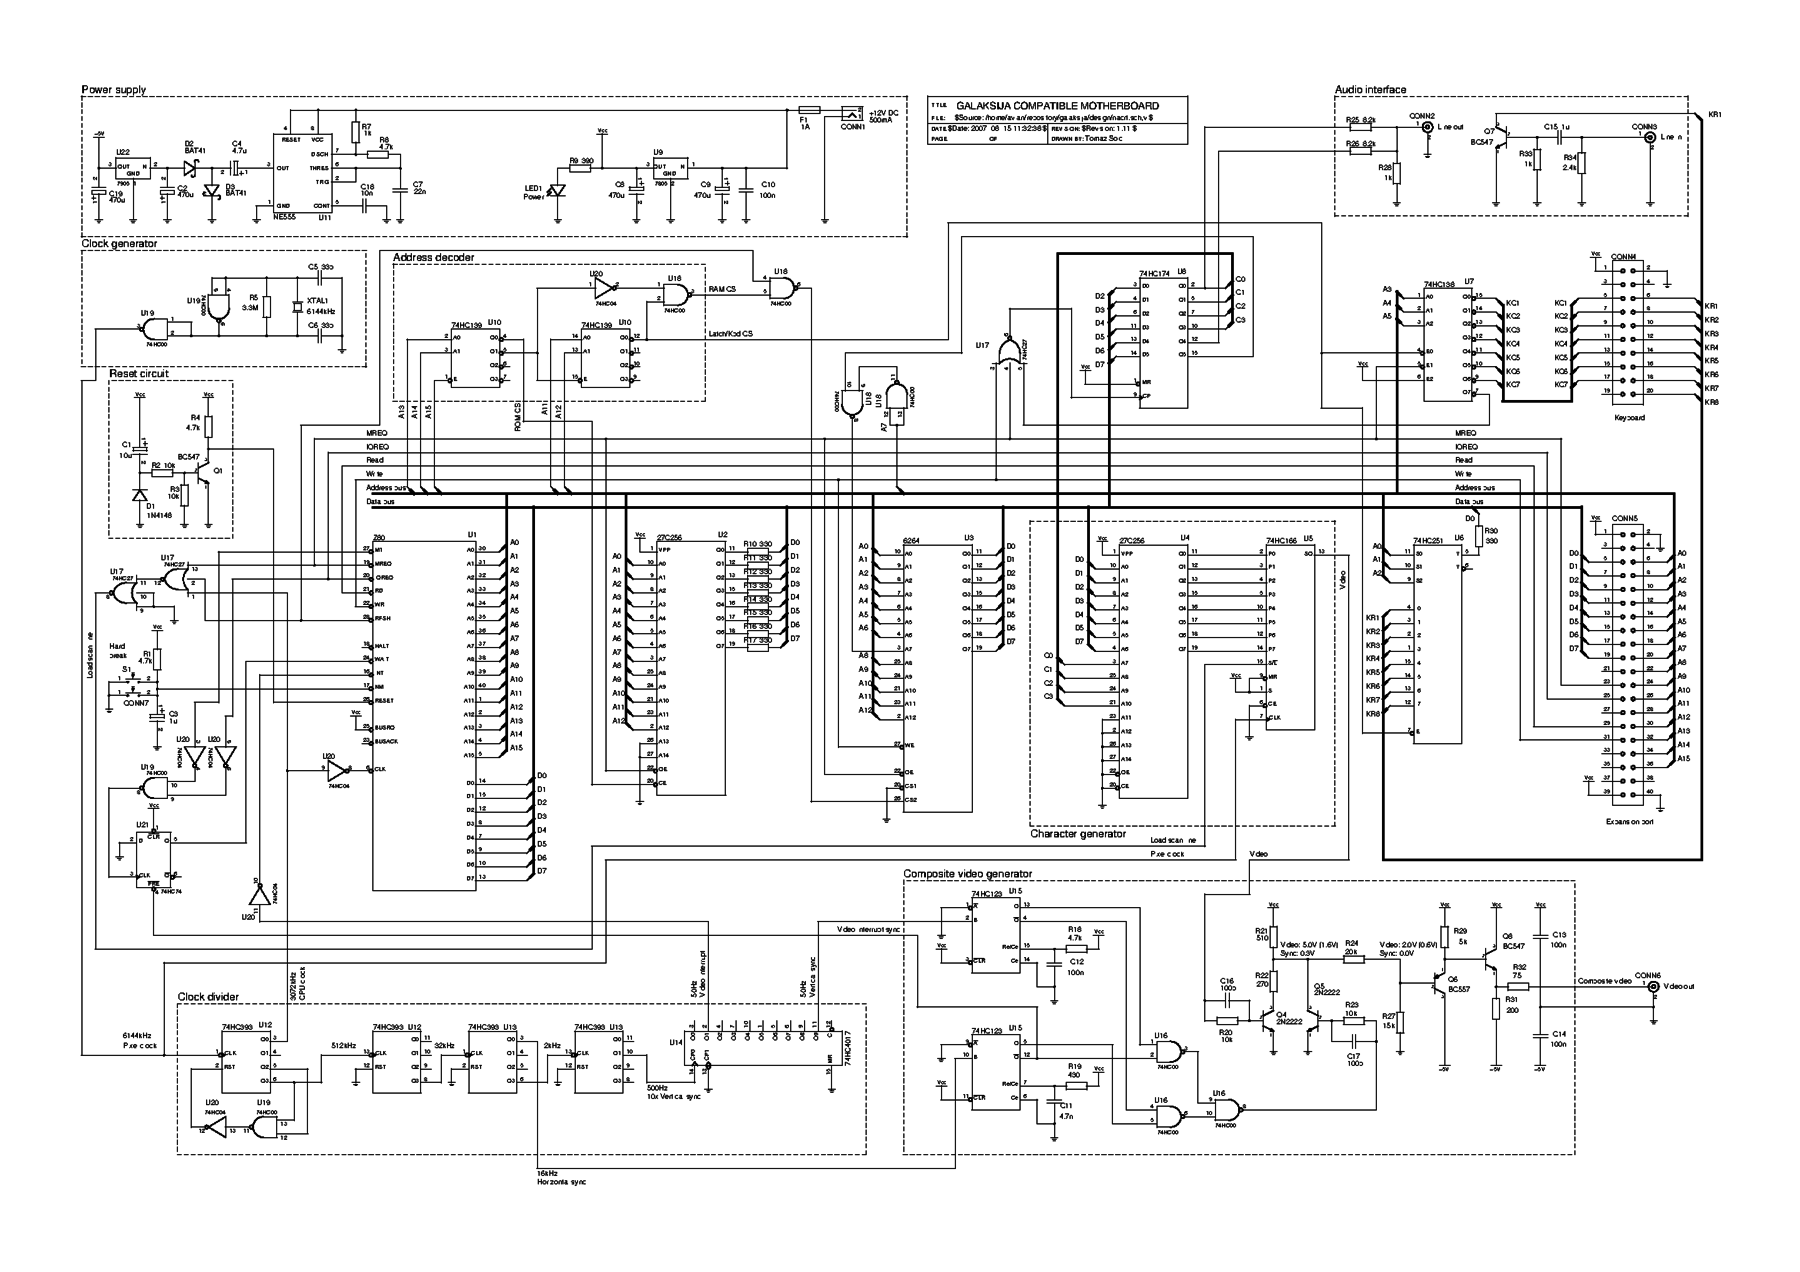
Finally I managed to extract a view-able schematic from the .SCH I found, using gEDA and the GIMP and some trial and error. opening the Schematic with gEDA proved a frustrating result, as the .SCH did not include schematic library elements for any of the logic building blocks, the .SCH opened as just a bunch of interconnects. However, while using the GIMP to extract a .PNG file from the malformed schematics, I discovered the GIMP showed a full preview of the previously incomplete Galksija schematic, and opening it with the GIMP proved to be a success, unlike the half a dozen other programs I tried before! So no I have the full schematic of CMOS Galaksija!
Here it is!
I'm studying it now
It looks simple enough, but compared to the original schematic as first published it a bit more involved. In fact the first schematic looks ridiculously simple, and it even includes the keyboard logic.
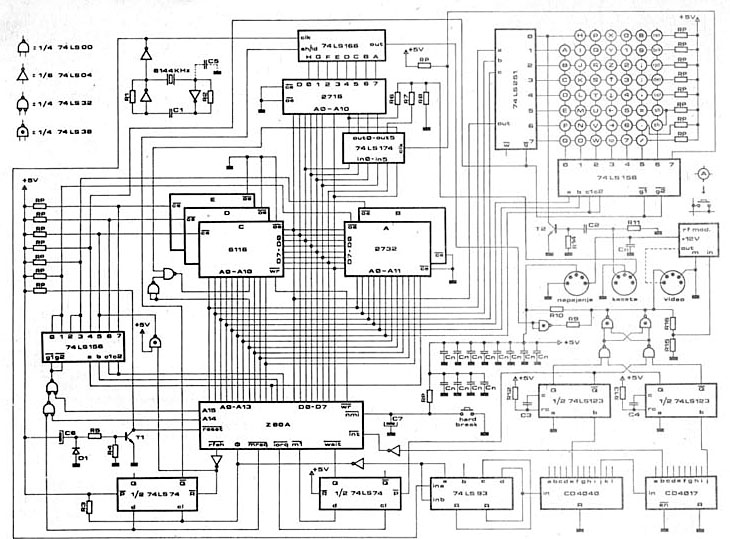
I also found this version, which is slightly more modern than the original, as it uses a GAL a simple programmable logic device, but gives no definition of the contents of the GAL, making it a puzzle to figure out what the GAL does, it also does not mention if it works with a modern Z80. File:GalaxySCH.pdf
I'm planning to bring back the CMOS schematic to its barest simplest form, and build it up on a simple single sided board with nothing but PTH components, for easy build-up, but still more modern than it was. From that I might add some extensions to the original.
September 2016
Layout work on the ZX81+35, and its PSG means I had to stall this project for now.
Resume working on it in February 2022
After a long time suffering from a strongly deteriorated health due to perhaps covid (But I don't remember having had covid) or perhaps from sitting inside all the time, my Asthma from which I always have suffered, but which was kept manageable with medication, got far worse to the extent that I got sick and could do almost nothing. Luckily in the Netherlands you will get an alimony from the state, and I got some pension money, so financially I could get just by for food and paying my rent. Now I'm slowly getting better an I decided to find something to do, other than moderating a forum, and doing some freelance repair work at a games museum, so I would become clearer in my head. So I decided to pick up where I left in 2016, my ZX81+38 clone seems to be working, and continuing my rhococo development is a bit too much for now, so why not create my own take on the Galaksija, which I will baptise "PanGalaksija" to distinguish it from other versions, and to announce this will be a "english" version that will be more modern. read Pan as "worldwide" as in Pandemic. I intend to make it as simple and cheap as possible. It will be based on the "CMOS Galaksija" so that it can work with modern Z80's, and I will use KiCad to design it. It will use a single dual sided PCB that is as small as is practical. It will be fed 5V through an USB connector, and will only output PAL composite video, not RF. It will use a keyboard based on my Rhococo keyboard, but integrated on the same PCB, using the same cheap but adequate keys, with square tops, and stickers for the text on them. as for the character set, and pseudo graphics, I don't like the separate pixels in the font, I like the TRS-80 style better, and I will try to improve it. It seems to support 128 characters now, so I hope I can add some game characters and lowercase if possible, I will remove characters specific to Yugoslavian (sorry for that), and will use a single (OTP)ROM and a 32K Static RAM chip, same as my ZX81+38.
February 11, 2022 Installed KCad 6 on PC at home
It look took some effort and cleaning up my old 2012 Mac Mini, but I finally managed to get KiCad 6 to work on my main PC at home, so I don't have to use my laptop, and will have a bigger screen to work with. I will first copy some of my KiCad designs to my Mac to see if they are even compatible with the much older KiCad on my linux Laptop. I'm investigating the possibility to have the character ROM in programmable RAM, that would enhance the capabilities for gaming enormously. For the moment I'm still staying with generating a monochrome PAL signal. I don't want to succumb to feature creep, in the interest of simplicity and cheapness, and compatibility.
February 14, Galaksija Keyboard schematic
I found a clear picture of the keyboard matrix of the Galaksija.
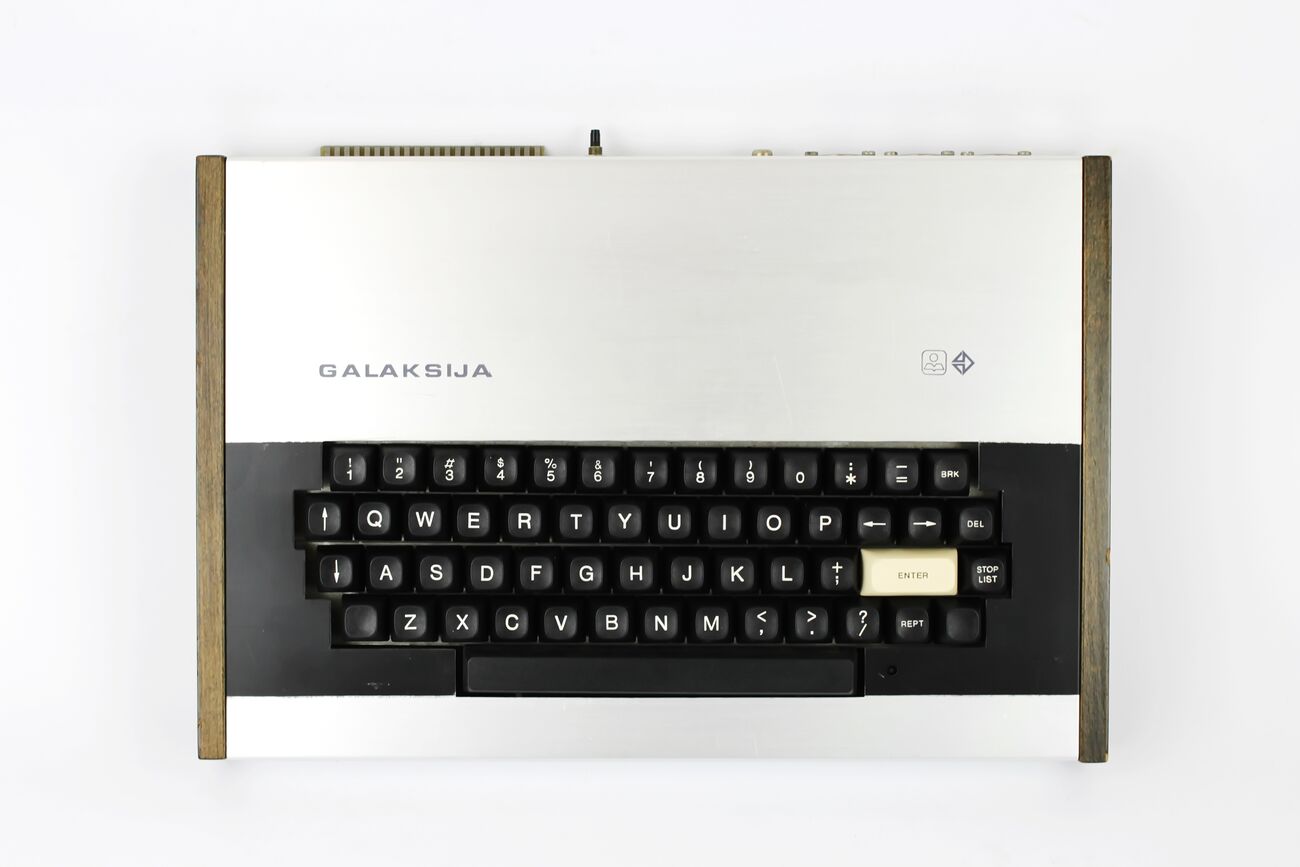
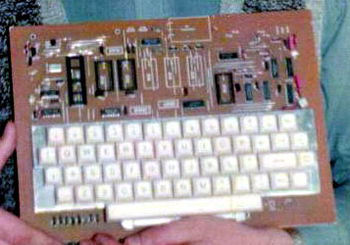
and a typical keyboard layout
February 16, drawn keyboard schematic and designed placement of keys
I figured out the schematic of kalaksija's keyboard matrix and entered it in an M3 sheet, I hope the whole schematic will fit on a single sheet. you can preview the schematic of the keyboard here: File:PanGalaksija keyboard schematic preview.pdf
I also imported the parts into the KiCAD PCB layout editor, and figured out a correct key placement, which was one hell of a puzzle, but I think I did it without making mistakes, as the enter key is twice as wide as the other keys, I used a second key for the right half, for the spacebar I made a compromise and used three keys, same as the rhococo. So I added new switches in the schematic, and added four new keys to the layout. I captured a picture from KiCad's 3D preview function, as the keys do not (yet) have a 3D shape, you will only see the keyplacemens as the unpopulated PCB would look. I also figured out that the board outline would be 8.85 inch wide or about 22.5 cm.
February 17, laid out the keyboard section
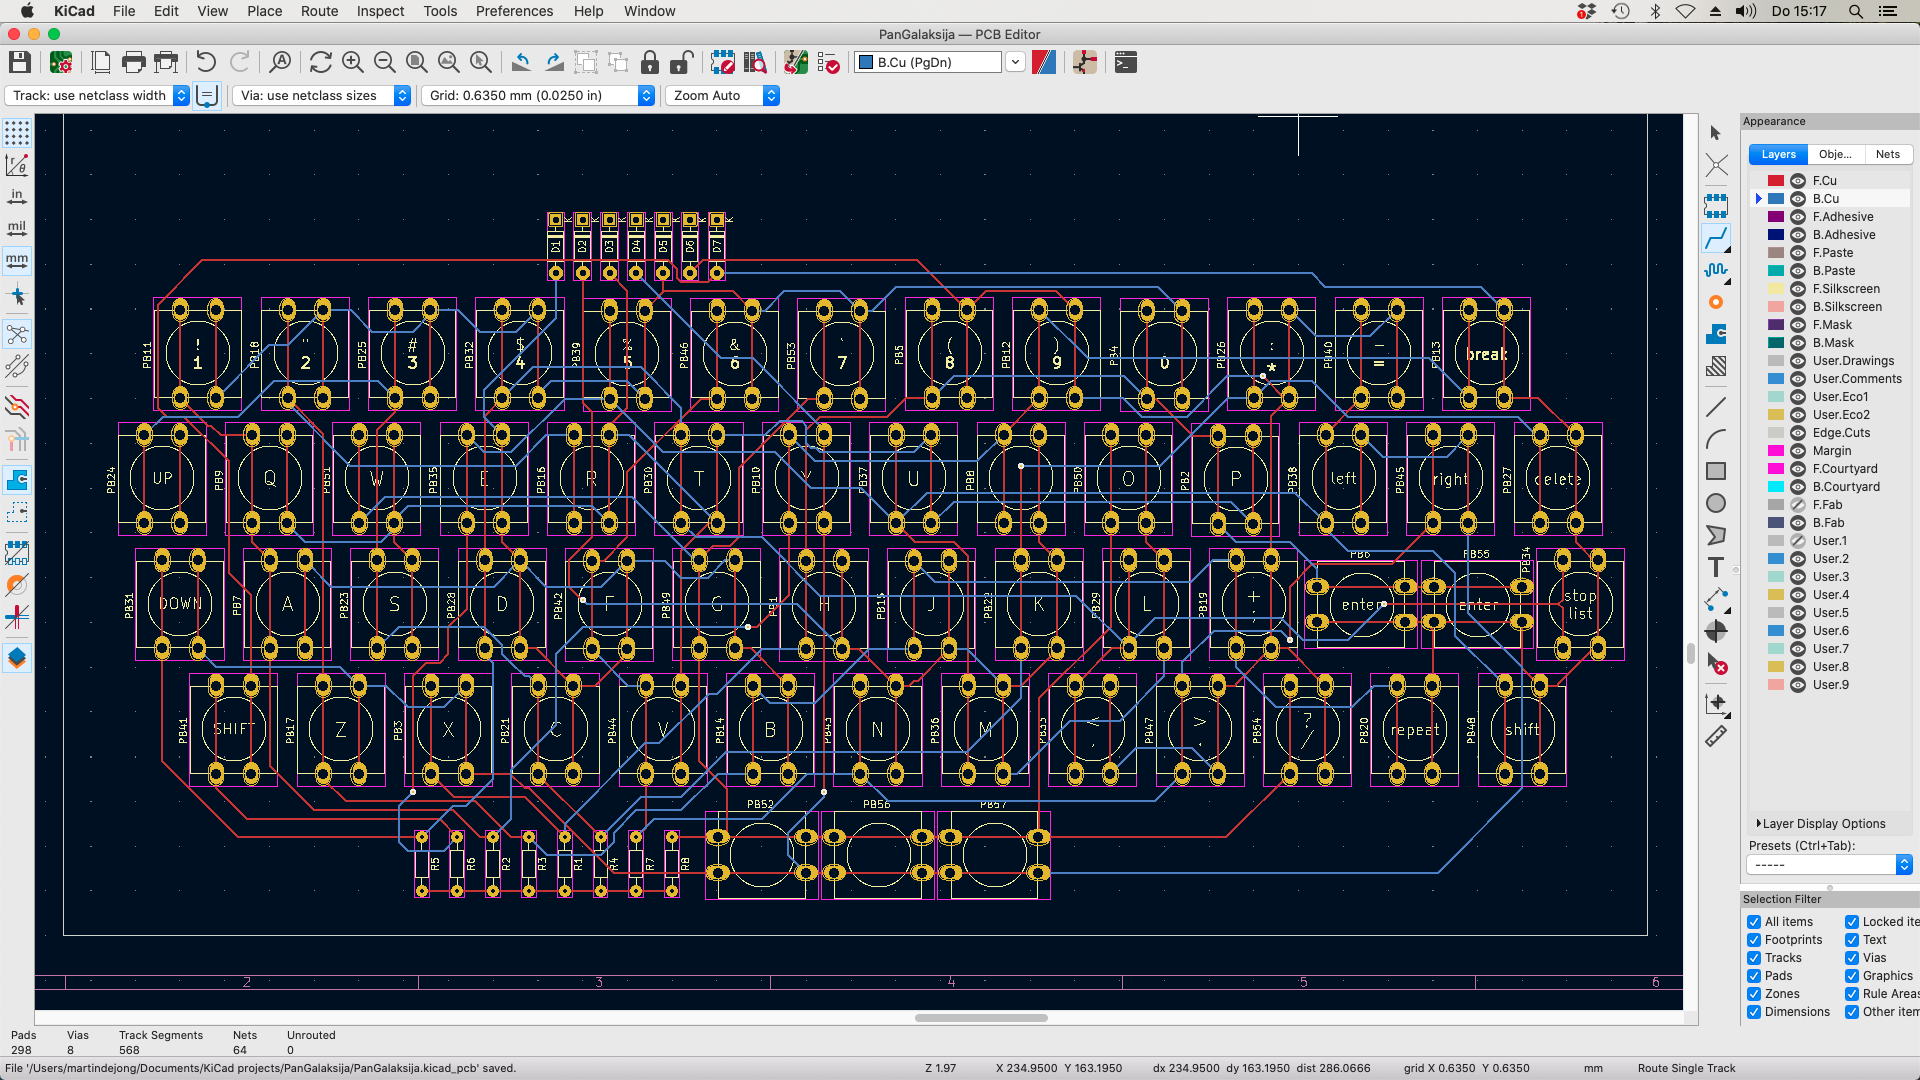
I laid out the keyboard, together with the pullup resistors, and the interface diodes. Red traces on top layer, blue traces on bottom (solder) layer. Note that the red traces between the longer distance pads of the keypad are actually part of the keypad, and are connected inside the key.
February 28, slowly filling in parts in the schematic
Did most of the 14-pin DIP IC's, but I have a problem with parts I wanted to "borrow" from my Rhococ design, such as the switch, the USB-B connector, and the 3.5mm Audio jacks it seems I designed the footprints of several components myself, and these are therefore not in the common footprint library of KiCad 6.0. I'm still working out how to copy them to the Galaksija design. Its not that I can simply paste the parts into the layout, as the schematic doesn't know how to connect to a part that isn't in the parts library. I hope I don't have to re-create the footprint again for the Galaksija.
My plan now is to just literally copy the CMOS galaksija design, and built that so I have a base that (hopefully) will simply work, after that I can figure out which enhancements I can create. I do want to remove the -5V generator, and use an USB-B connector instead of using the hated barrel connector and an 7805 regulator, so I will change that aspect of CMOS Galaksija, and so I also have to change the composite video output driver as it relies of having -5V. I will also add an on/off switch, and maybe try to add a joystick via keyboard presses interface. these are relatively safe extensions. will add some idea's for extensions as long as they don't interfere with the basic CMOS design. If revision 1 of PanGalaksija is working I can try several idea's I have.
March 9, schematic revision 1.0 finished, plus placement of components
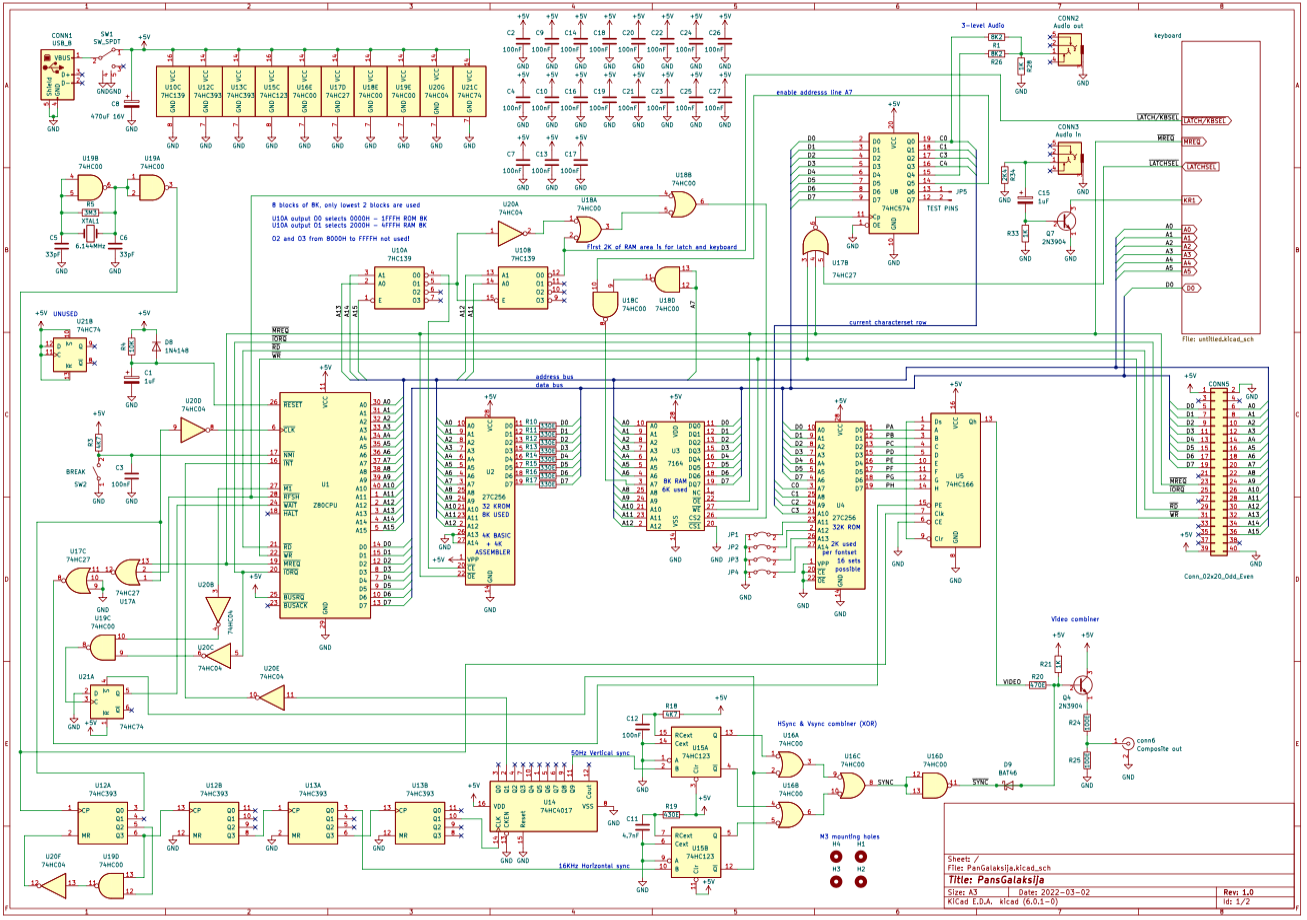
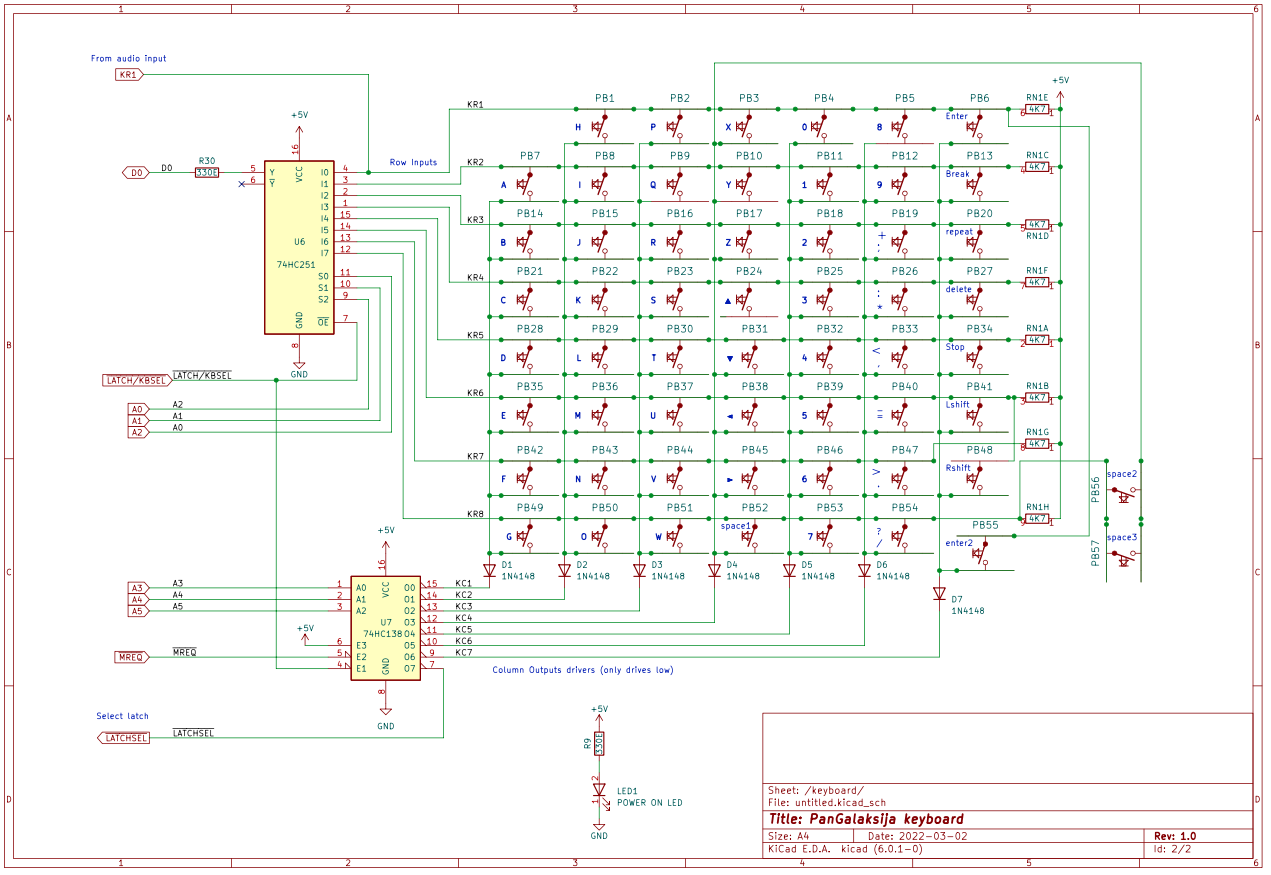
Today I finished the schematic of revision 1.0 of PanGalaksija, updated it to the PCB and placed all the components, also imported the earlier routing of the keyboard, including the diodes and pullups, now used a 9-pin resistor network for the pullups. You can see the full schematic in a .PDF here: File:PanGalaksija schematic rev1.0.pdf
This is the main section, the keyboard is on a separate sheet.
This is the keyboard section of PanGalaksija rev 1.0
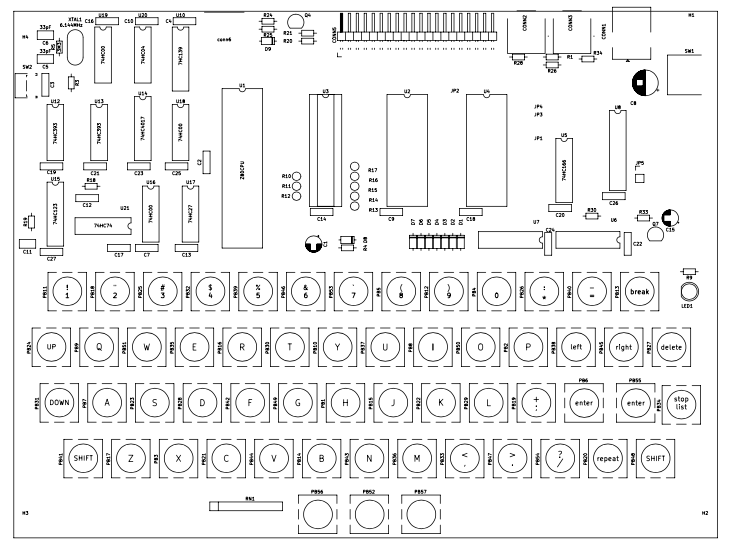
This is how the preliminary placement of the PanGalaksija PCB revision 1.0 looks like (note that this placement is strictly preliminary, and can change a lot when the layout makes it necessary.
File:PanGalaksija-component placement rev 1.0.pdf
and this is the picture:
Next is finishing the components that have no, or incomplete 3D shapes, so we can create a 3D preview.
March 15, 2022 suspended working on PanGalaksija for now
Now that a ZX-81 enthusiast has got the sd-card interface working for my ZX81+35 clone, I suspended work on my PanGalaksija in favour of working on a PSG board with 32K RAM and OTP ROM socket for a real ZX-81 (and for my ZX-81+38 clone) . I will resume to the PanGalaksija afterwards.
