Designing an enclosure for RhoCoCo: Difference between revisions
No edit summary |
|||
| Line 1: | Line 1: | ||
{{Project | {{Project | ||
|Name=The design of an | |Name=The design of an enclosure for RhoCoCo | ||
|Picture=RhoCoCo 3D full preview rendering with red enclosure.PNG | |Picture=RhoCoCo 3D full preview rendering with red enclosure.PNG | ||
|Omschrijving=Now that the "motherboard", and the keyboard of the Retro Home Color Computer is finished, it is time to think about the various options for its | |Omschrijving=Now that the "motherboard", and the keyboard of the Retro Home Color Computer is finished, it is time to think about the various options for its enclosure (case). Here is one option, a simple rectangular case out of laser-cut plastic. | ||
|Status=Initializing | |Status=Initializing | ||
|Contact=Mahjongg | |Contact=Mahjongg | ||
| Line 10: | Line 10: | ||
== This is a page about the design of an enclosure for the RhoCoCo Retro | == This is a page about the design of an enclosure for the RhoCoCo Retro Home-computer == | ||
Initially I thought that the simplest | Initially I thought that the simplest solution would be to have the keyboard and motherboard on the same "plane", like the ZX80 and ZX81, and simply mount both on a plank of wood. I even considered using a single PCB for both, just like the ZX80/ZX81, but then the PCB would have become about three times larger, and all of it would be a dual-sided PCB, where I was convinced that the keyboard could be routed on a much cheaper single sided PCB. still, and like my ZX81+35 ZX-81 clone they could connect together with simple angled pin-header connectors (male and female). | ||
The problem with this approach is that many of the components on the main PCB are much higher than the height of the buttons on the keyboard. This means that (with a case made of thin wood or plastic plate) the "motherboard" cant fit when connected with pin-headers, when you want to extend the top plate of the enclosure, (the plate that fits on top of the keyboard) all the way to the back of the enclosure, like the picture in the top right. | The problem with this approach is that many of the components on the main PCB are much higher than the height of the buttons on the keyboard. This means that (with a case made of thin wood or plastic plate) the "motherboard" cant fit when connected with pin-headers, when you want to extend the top plate of the enclosure, (the plate that fits on top of the keyboard) all the way to the back of the enclosure, like the picture in the top right. | ||
Revision as of 22:20, 11 December 2018
| Project The design of an enclosure for RhoCoCo | |
|---|---|

| |
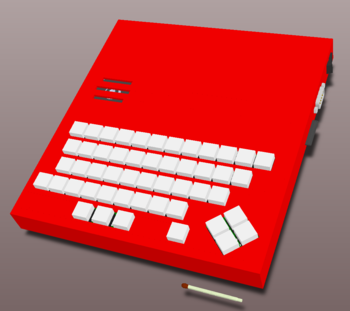
| Now that the "motherboard", and the keyboard of the Retro Home Color Computer is finished, it is time to think about the various options for its enclosure (case). Here is one option, a simple rectangular case out of laser-cut plastic. | |
| Status | Initializing |
| Contact | Mahjongg |
| Last Update | 2018-12-11 |
This is a page about the design of an enclosure for the RhoCoCo Retro Home-computer
Initially I thought that the simplest solution would be to have the keyboard and motherboard on the same "plane", like the ZX80 and ZX81, and simply mount both on a plank of wood. I even considered using a single PCB for both, just like the ZX80/ZX81, but then the PCB would have become about three times larger, and all of it would be a dual-sided PCB, where I was convinced that the keyboard could be routed on a much cheaper single sided PCB. still, and like my ZX81+35 ZX-81 clone they could connect together with simple angled pin-header connectors (male and female).
The problem with this approach is that many of the components on the main PCB are much higher than the height of the buttons on the keyboard. This means that (with a case made of thin wood or plastic plate) the "motherboard" cant fit when connected with pin-headers, when you want to extend the top plate of the enclosure, (the plate that fits on top of the keyboard) all the way to the back of the enclosure, like the picture in the top right.
It also prevents that you can mount the keyboard on a slight slope, although straight (strictly horizontal) keyboards are normal for laptops. So I don see the need for RhoCoCo to have a sloped keyboard.
The ZX80 (and ZX81) have a heightened part behind the keyboard sloping up to the back, where the highest parts are, but for simplicity a simple rectangular case seems simpler, when you make a case out of laser-cut plastic plate, which seems the cheapest option.