Compaq LTE Elite 4/50E: Difference between revisions
Floppy emulator |
|||
| (35 intermediate revisions by the same user not shown) | |||
| Line 1: | Line 1: | ||
{{Project | {{Project | ||
|Name=Compaq LTE 4/50E | |Name=Compaq LTE Elite 4/50E | ||
|Picture= | |Picture=Compaq_LTE_4-50E_tv_opendag.jpg | ||
|Omschrijving=I found a 1994 laptop, what can it still do? | |Omschrijving=I found a 1994 laptop, what can it still do? | ||
|Status=In progress | |Status=In progress | ||
|Contact=Peetz0r | |Contact=Peetz0r | ||
}} | }} | ||
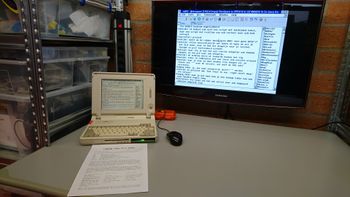
I found this old laptop and I'm figuring out what to do with it. Fun fact: this laptop is almost exactly as old I am. | I found this old laptop and I'm figuring out what to do with it. Fun fact: this laptop is almost exactly as old as I am. | ||
= First impression = | = First impression = | ||
== Status when I found it == | == Status when I found it == | ||
It had the (presumably) original harddrive still present and working (after 23 years!). On it was Windows 3.x with lots of Compaq bloatware and personal data of the previous owner. I decided | It had the (presumably) original harddrive still present and working (after 23 years!). On it was Windows 3.x with lots of Compaq bloatware and personal data of the previous owner. I decided to keep this as-is, because the original software/drivers/etc is hard to find/replace but I did not peek around very much because of privacy reasons. The battery was very much dead, the floppy drive did not work, and the bottom RAM cover was missing, but it did work just fine. | ||
A service manual was easy to find online: [[Media:Compaq LTE Elite service manual.pdf]] (2.6 MB, 387 pages). | |||
This web page was much harder to find: http://tuxmobil.org/compaq_lte475cx_en.html | |||
Somehow the product page on HP.com is still alive: https://support.hp.com/nl-nl/product/compaq-lte-elite-notebook-pc-series/96327. ''(HP acquired Compaq in 2002, but the brand remained in use by HP until 2013.)'' | |||
== Specs == | == Specs == | ||
* 486 DX2 50 MHz | * 486 DX2 50 MHz | ||
* | * 12 MB ram (4 MB onboard + 8 MB (came with 4 MB) on a proprietary expansion card) | ||
* 250 MB harddisk | * 250 MB harddisk | ||
* 9,5" 640x480 monochrome TFT display | * 9,5" 640x480 monochrome TFT display | ||
| Line 28: | Line 34: | ||
== Storage == | == Storage == | ||
The first thing I did was take out the original harddrive and go replace it with something else. I went to Aliexpress and got myself a IDE-CF adapter and a 2GB CF card. It could not boot from the card. I borrowed some more cards from another Revspacer and found out that cards up to | The first thing I did was take out the original harddrive and go replace it with something else. I went to Aliexpress and got myself a IDE-CF adapter and a 2GB CF card. It could not boot from the card. I borrowed some more cards from another Revspacer and found out that cards up to 1GB work but larger cards do not. But since the original disk was 250 MB, I decided that 256MB would be enough. I ordered an [https://uk.transcend-info.com/Embedded/Products/No-524 "industrial"] 256MB card and it has been working just fine so far. The original harddrive sits in a aluminium caddy, which is easily removable. That's great, since this is the only way to move files from/to this machine I'll have to use this rather often. <!-- TODO: foto van storage --> | ||
== Floppy drive == | == Floppy drive == | ||
The floppy drive does not work. It does make some noises but the disk never spins. The rubber belt inside was very much disintegrating, but replacing the belt did not result in a working drive yet. But even if it did, I have no other devices anywhere with a floppy drive anyway. WONTFIX. By the way, the drive is a Citizen W1D. | The floppy drive does not work. It does make some noises but the disk never spins. The rubber belt inside was very much disintegrating, but replacing the belt did not result in a working drive yet. But even if it did, I have no other devices anywhere with a floppy drive anyway. WONTFIX. By the way, the drive is a Citizen W1D. | ||
2024 update: I fixed it. See [[Compaq_LTE_Elite_4/50E#Floppy_emulator]] | |||
== Display == | == Display == | ||
| Line 40: | Line 48: | ||
== Sound == | == Sound == | ||
There is only a PC speaker inside. But it's a very loud one. Fortunately we get to change the volume trough Fn keys. It even has a graphical | There is only a PC speaker inside. But it's a very loud one. Fortunately we get to change the volume trough Fn keys. It even has a graphical OSD regardless of OS (in textmode and some graphical modes)! | ||
= Modding! = | = Modding! = | ||
| Line 49: | Line 57: | ||
== Serial port == | == Serial port == | ||
I also ordered a bunch of [https://www.aliexpress.com/item/1pcs-lot-MAX3232-RS232-to-TTL-Serial-Port-Converter-Module-DB9-Connector-MAX232/32722395554.html | I also ordered a bunch of [https://www.aliexpress.com/item/1pcs-lot-MAX3232-RS232-to-TTL-Serial-Port-Converter-Module-DB9-Connector-MAX232/32722395554.html MAX3232 boards] and I had some CH340 ttl-serial-usb lying around. So I took one of both and connected them to my modern linux laptop at first. I could get a serial console, run ssh, and even revbank inside the Windows 3.1 Terminal app. | ||
So I now needed a way to connect the Badge sitting in the battery bay to the serial port on the back of the laptop. Complete disassembly was required. I decided to make a second serial port parallel to the first port. This breaks when you connect devices to both ports, [http://www.jargon.net/jargonfile/d/Dontdothatthen.html so don't do that then!]. At first I connected it directly to a | So I now needed a way to connect the Badge sitting in the battery bay to the serial port on the back of the laptop. Complete disassembly was required. I decided to make a second serial port parallel to the first port. This breaks when you connect devices to both ports, [http://www.jargon.net/jargonfile/d/Dontdothatthen.html so don't do that then!]. At first I connected it directly to a MAX3232 board, but than I decided to make it removable, just like the original battery. So I yanked a DE9 port from an old desktop board from the e-waste pile and soldered it in parallel to the rear port on a short ribbon cable, snipped away some plastic, added some padding and hotglue. We now have a internal DE9 serial port inside the <del>battery bay</del> BadgeBay™! | ||
I only found out that the boards have a MAX3232 (not a MAX232) on board, which is a good thing. The MAX232 can only be powered from 5V and can only produce 5V out (the input is 3.3V tolerant). But the MAX3232 can be powered anywhere between 3.0V and 5.5V, and the logic output voltage will be that voltage as well. So, the MAX3232 is just a more flexible version of the MAX232. | |||
During the disassembly process the fan connector broke off. But that's okay as you'll read in the next section. | During the disassembly process the fan connector broke off. But that's okay as you'll read in the next section. | ||
| Line 57: | Line 67: | ||
== +5V hackery == | == +5V hackery == | ||
Up to this part, the Badge and the | Up to this part, the Badge and the MAX3232 were powered from an external USB supply (mostly my modern laptop since I was flashing/debugging the Badge all the time anyway). But this wouldn't be good enough for a permanent setup. So I needed a way to connect Ground and +5V from the laptop to the badge. Ground was already present in the DE9 connector, so we are already halfway! But that's not enough. I needed a way to connect one extra pin reliably while keeping the carefully constructed hotpluggable toolless BadgeBay™ system intact. So i snipped one of the retaining screw thingies seperate from the shielding, connected a red wire, and then I hotglued a metal spring to the inside of the laptop. I soldered a red wire to the spring as well. I lined the spring up with the DE9 retaining screw. | ||
Back to the broken fan connector. I spliced the wires from there and from the spring (and later another wire for the OPL2LPT) together and connected those to the pads behind the fan connector. We now have a BadgeBay™ +5V rail! | Back to the broken fan connector. I spliced the wires from there and from the spring (and later another wire for the OPL2LPT) together and connected those to the pads behind the fan connector. We now have a BadgeBay™ +5V rail! | ||
At this point the BadgeBay™ hardware was more or less working. A few weeks later I ordered my soundcards. The CVX4 does not need any external power, but the OPL2LPT does. It has a mini-usb connector to power it from a nearby USB port, which this laptop lacks. Powering it from any external source works fine but is clunky. The OPL2LPT kit already has pads for a DIY power header. Since the ground was already connected trough the pins in the port and/or shielding, I again only needed to worry about the +5V. So I added another red wire to my already existing splice near the fan connector and made this one long enough to reach all the way from there to the left side of the laptop, trough the PCMCIA cover, around the back, and into the OPL2LPT +5V header. But when | At this point the BadgeBay™ hardware was more or less working. A few weeks later I ordered my soundcards. The CVX4 does not need any external power, but the OPL2LPT does. It has a mini-usb connector to power it from a nearby USB port, which this laptop lacks. Powering it from any external source works fine but is clunky. The OPL2LPT kit already has pads for a DIY power header. Since the ground was already connected trough the pins in the port and/or shielding, I again only needed to worry about the +5V. So I added another red wire to my already existing splice near the fan connector and made this one long enough to reach all the way from there to the left side of the laptop, trough the PCMCIA cover, around the back, and into the OPL2LPT +5V header. But when not in use, this cable hides neatly behind the PCMCIA door. | ||
<gallery> | <gallery> | ||
Compaq LTE 4-50E battery-caddy-print-1.JPG|One of the failed BadgeBay™ designs. The Hexagon grid on the bottom layer was too thin. | Compaq LTE 4-50E battery-caddy-print-1.JPG|One of the failed BadgeBay™ designs. The Hexagon grid on the bottom layer was too thin. | ||
Compaq LTE 4-50E usb-serieel.jpg|Serial - | Compaq LTE 4-50E usb-serieel.jpg|Serial - MAX3232 board - CH340 board - USB. | ||
Compaq LTE 4-50E revbank.jpg|Revbank over serial console. | Compaq LTE 4-50E revbank.jpg|Revbank over serial console. | ||
Compaq LTE 4-50E internal-serial-0.JPG|Bottomside of the mainboard. | Compaq LTE 4-50E internal-serial-0.JPG|Bottomside of the mainboard. | ||
| Line 86: | Line 96: | ||
=== CVX4 === | === CVX4 === | ||
This is basically a Covox Speech Thing clone, but less ugly. | This is basically a Covox Speech Thing clone, but less ugly. The output is a pure line level signal. It won't drive headphones and really needs an amplifier. But it works great when hooked up to the TV at the space. There are even Windows 3.11 drivers for it. | ||
[https://github.com/volkertb/temu-vsb SBEMU and TEMU] are old 1990's era drivers to partially emulate Sound Blaster or Tandy sound on the Covox Speech Thing. This depends on QEMM and does not work with EMM386. I haven't tried with QEMM yet. | [https://github.com/volkertb/temu-vsb SBEMU and TEMU] are old 1990's era drivers to partially emulate Sound Blaster or Tandy sound on the Covox Speech Thing. This depends on QEMM and does not work with EMM386. I haven't tried with QEMM yet. | ||
== New Battery? == | == New Battery? (obsolete) == | ||
[[File:Compaq_LTE_4-50E_powerbang_2.JPG|240px|thumb|right|Powerbang installed in the bay, on the left there was a pi0w]] | |||
I have decided to replace the original battery with a modern version, based on the [[User:Mux|Muxtronics Powerbang]] with 3 18650 cells. This would be more than the capacity of the original battery in less than 1/3rd of the volume in cells. I can charge it using a micro usb port on the front. The Powerbang is programmable and does pretty accurate measurements. | |||
Plans for the future: | |||
* communicate between the pi0w and powerbang over serial (not interfering with pppos, requires either softserial or serial-usb over the OTG port) | |||
* make a web interface to monitor power usage, compatible with ancient browsers | |||
* upgrade to the USB-C PD version which mux might be working on | |||
* maybe add a led battery indicator on the front | |||
* improve usability of the front panel, maybe by making it thinner, and making the shape more like the laptop itself and less like a flat surface | |||
== No Battery! == | |||
[[File:Compaq_LTE_4-50E_usb-pd_1.jpg|240px|thumb|left|USB PD module installed in the bay, on the left there's a GL.iNet]] | |||
[[File:Compaq_LTE_4-50E_usb-pd-2.jpg|240px|thumb|left|It works! (if your USB PD source can supply 12V that is...)]] | |||
Over a year later, after doing [https://gitlab.com/Peetz0r/usb-c-grok some] [[PeetR0ver|other]] [[Monsteraccu|projects]] involving USB type C and USB Power Delivery, I decided that this project needed to join the bunch. Also having another battery to keep charged in a project that is infrequently used is not ideal. | |||
So I basically re-3d-modeled the battery bay replacement to have a small USB PD trigger module in the front. This also leaves enough space to have the GL.iNet in the front panel too (I got rid of the pi0w, it was unreliable as fuck). Also printed it on the Prusa in 2 colors because why not (all early 2018 printing was done on the Ultimaker). | |||
== Memory upgrade == | |||
I ordered a 8 MB ram module from ebay, and it works. So it now has 12 MB total memory. I am still looking for a 16 or 24 MB module. | |||
Note to self: possibly useful keywords | |||
* "Kingston KTC-ELITE" | |||
* 3.3V | |||
* 70ns | |||
* 4 MB orig p/n: 199013-001 spare p/n: 194188-001 | |||
* 8 MB orig p/n: 199014-001 spare p/n: 194189-001 | |||
* 16 MB orig p/n: 196806-001 spare p/n: 196799-001 | |||
From the manual: ''"NOTE: Some early memory expansion boards for the Concerto Family of Personal Computers (option kit numbers 144790-001 and 144790-002) operate at 80 ns and do not function properly when installed in the Compaq LTE Elite Family of Personal Computers, which operate at 70 ns. Use only Compaq LTE Elite memory expansion boards (Table 3-2)."'' So yeah, watch out for timing. Also, voltages. | |||
Also, let's not [https://www.youtube.com/watch?v=BX8rJtpTTVk do what AkBKukU did]. | |||
== Floppy emulator == | |||
Someone made a floppy drive emulator for it! | |||
* Video: https://www.youtube.com/watch?v=6x54SSQnMsc | |||
* Github repo: https://github.com/silvervest/OpenFlops-W1D | |||
* Store: https://silvestrons-bits-and-bytes.square.site/product/openflops-w1d-floppy-drive-emulator/6 | |||
= Software = | = Software = | ||
| Line 115: | Line 158: | ||
* Logitech Trackball drivers | * Logitech Trackball drivers | ||
This is a rather long list. My clean install of Dos 6.22 and Windows 3.11 (NOT for workgroups!) does not | This is a rather long list. My clean install of Dos 6.22 and Windows 3.11 (NOT for workgroups!) works, but is missing some drivers, most notably graphics drivers. It does 640x480 16 colors out of the box, but it can do 1024x768 256 colors with the WS24A2 drivers. Also, the BIOS does not have it's own UI like any modern BIOS, you need tpo configure it with a specific Compaq tool. | ||
==SoftPaq== | |||
[[File:Compaq_LTE_4-50E_wallpaper.png|240px|thumb|right|The original wallpaper, from SP1585]] | |||
[[File:Compaq_LTE_4-50E_rompaq_2.png|240px|thumb|right|SP2341. They called it ROMPAQ.exe]] | |||
Somewhere on a dusty corner of ftp.hp.com all the original drivers and firmware and other stuff is still there in the form of SoftPaq's. Those are numered items, consisting of usually a .txt and a .exe file, where the .exe is a program that self-extracts and wrtes to a diskette. The only way to make this work is to run this in qemu, write to virtual diskettes, and copy all the stuff to directories on the CF card which had MS DOS and Windows. Some of the stuff are just installers for drivers, but some are supposed to be bootable. These things are just DOS programs packaged with a specific DOS variant, but they also run on normal MS DOS. In one case I had to disable EMM386 to upgrade the bios, but it worked just fine. | |||
{| class="wikitable" | |||
! number | |||
! Download | |||
! Original name | |||
! Date | |||
! My own description | |||
|- | |||
|SP1246 | |||
|[ftp://ftp.hp.com/pub/softpaq/sp1001-1500/sp1246.txt .txt] [ftp://ftp.hp.com/pub/softpaq/sp1001-1500/sp1246.exe .exe] | |||
|Portable Computer Setup for Windows | |||
|<span style="white-space:nowrap">1995-06-12</span> | |||
|Windows 3.1 tool to change Bios settings | |||
|- | |||
|SP1247 | |||
|[ftp://ftp.hp.com/pub/softpaq/sp1001-1500/sp1247.txt .txt] [ftp://ftp.hp.com/pub/softpaq/sp1001-1500/sp1247.exe .exe] | |||
|Win 3.1 Display Support for Elite & Contura 400 | |||
|1995-06-12 | |||
|Windows drivers (and display setup utility) for the Western Digital WD24A2 | |||
|- | |||
|SP1250 | |||
|[ftp://ftp.hp.com/pub/softpaq/sp1001-1500/sp1250.txt .txt] [ftp://ftp.hp.com/pub/softpaq/sp1001-1500/sp1250.exe .exe] | |||
|Compaq PCMCIA Support | |||
|1995-06-12 | |||
|I don't need or use any PCMCIA cards, but one of the other SoftPaq's required a file which is in here | |||
|- | |||
|SP1585 | |||
|[ftp://ftp.hp.com/pub/softpaq/sp1501-2000/sp1585.txt .txt] [ftp://ftp.hp.com/pub/softpaq/sp1501-2000/sp1585.exe .exe] | |||
|Portables Windows Supplemental Programs Diskette (PWSPD) | |||
|1996-05-17 | |||
|This is a bunch of software, some of which is bloatware but some of it is useful utilities. It allows you to set the location of the on screen display but it also resets your wallpaper to a tiled monochrome Compaq logo. | |||
|- | |||
|SP2054 | |||
|[ftp://ftp.hp.com/pub/softpaq/sp2001-2500/sp2054.txt .txt] [ftp://ftp.hp.com/pub/softpaq/sp2001-2500/sp2054.exe .exe] | |||
|Computer Setup and Diagnostics for Portables | |||
|1996-11-06 | |||
|This creates 2 diskettes, one with a bootable setup tool (almost the same as the one in SP1246) and another one with a diagnostics tool (whish does not work... yet). | |||
|- | |||
|SP2341 | |||
|[ftp://ftp.hp.com/pub/softpaq/sp2001-2500/sp2341.txt .txt] [ftp://ftp.hp.com/pub/softpaq/sp2001-2500/sp2341.exe .exe] | |||
|LTE Elite System ROM (12 Sep 1996) | |||
|1996-11-19 | |||
|I updated my BIOS from 1995-01-10 to 1996-09-12, in 2018! It saved a backup on the "diskette" (which is the CF card of which I have images on my modern laptop). | |||
|} | |||
==DOS 6.22== | |||
* [https://www.4dos.info/v4dos.htm#751 4DOS] 8.00 (command.com replacement from FreeDOS with features such as tab completion) | |||
* [http://www.glennmcc.org/ Arachne] 1.97 (A graphical web browser which is almost a complete desktop environment) | |||
* [https://code.google.com/archive/p/nanox-microwindows-nxlib-fltk-for-dos/downloads DilloDOS 3.02b] (A port from [https://www.dillo.org/ Dillo] for DOS. [http://www.bttr-software.de/forum/forum_entry.php?id=10859 More info]. Too bad it doesn't work yet.) | |||
* [https://www.dosgamesarchive.com/download/doom/ DOOM] (demo version) | * [https://www.dosgamesarchive.com/download/doom/ DOOM] (demo version) | ||
* [https://www.dosgamesarchive.com/download/wolfenstein-3d/ Wolfenstein 3D] (demo version) | * [https://www.dosgamesarchive.com/download/wolfenstein-3d/ Wolfenstein 3D] (demo version) | ||
* [https://www.dosgamesarchive.com/download/duke-nukem-3d/ Duke Nukem 3D] (demo version) | |||
* [https://www.dosgamesarchive.com/download/transport-tycoon-deluxe/ Transport Tycoon Deluxe] (demo version) | * [https://www.dosgamesarchive.com/download/transport-tycoon-deluxe/ Transport Tycoon Deluxe] (demo version) | ||
* [https://archive.org/details/msdos_Pinball_Fantasies_1992 Pinball Fantasies] (archive.org version, because of silly manual lookup copy protection. It's 2018 damnit!) | * [https://archive.org/details/msdos_Pinball_Fantasies_1992 Pinball Fantasies] ([https://archive.org/details/msdos_Pinball_Fantasies_1992 archive.org version], because of silly manual lookup copy protection. It's 2018 damnit!) | ||
* [http://www.vgmpf.com/Wiki/index.php/AdLib_Juke_Box AdLib Jukebox] and [http://www.vgmpf.com/Wiki/index.php/AdLib_Visual_Composer AdLib Visual Composer] | * [http://www.vgmpf.com/Wiki/index.php/AdLib_Juke_Box AdLib Jukebox] and [http://www.vgmpf.com/Wiki/index.php/AdLib_Visual_Composer AdLib Visual Composer] | ||
== | ==Windows 3.11== | ||
[[File:Compaq_LTE_4-50E_netscape3-cam4.JPG|240px|thumb|right|Woah, MJPEG actually works!]] | |||
* Internet Explorer 3.0.1152 | |||
* Netscape Navigator 3.04 | |||
* Opera Browser 3.62 | |||
* mIRC 5.91 | |||
* WinZip 5.0 | |||
* [https://archive.org/details/win3_wnspd WinSpeed 1.0] (just a silly benchmark to compare between this laptop, QEMU and DosBox) | |||
==[http://distro.ibiblio.org/baslinux/ BasicLinux 3.50]== | |||
[[File:Compaq_LTE_4-50E_basiclinux-xterm.JPG|240px|thumb|left|top and uname -a in an xterm on BasicLinux]] | |||
This is a linux distro from 2007 with a 2.2 kernel. It claims to require only 3MB ram but this is a lie: it kernel panicks when I try to boot it with only 4 MB present. It does not boot in QEMU or DosBox but it works and after [http://distro.ibiblio.org/baslinux/xvesa.html some fiddling around] even X works. For some reason only when I output to an external monitor only while running startx but after starting X it displays fine on either or both screens...? | |||
Just like Windows 3.11, it boots from DOS, so I can now make a DOS startup menu and make this a triple boot system! I also resized the filesystem from the default 20MB to 64MB. | |||
This was also the easiest OS to make PPP work. It's just plain pppd after all :) | |||
==[http://delicate-linux.net/ DeLi(cate) linux 0.1 alpha5]== | |||
[[File:Compaq_LTE_4-50E_delicate-linux.JPG|240px|thumb|right|top and uname -a on DeLi(cate)]] | |||
This is the most modern Linux that I am able to run. The kernel is 2.4.37 which is released in 2010. This specific kernel is compiled in 2013 and the image released in 2014. | |||
==NetBSD 7.1.2== | |||
This is probably the most modern OS that has some support for running on 8 MB ram. It has a GENERIC_TINY kernel config which is supposed to run on even 4 MB, and.... it panics. But that's okay, it works fine in 8 MB and it can run pppd and ssh to modern machines when it runs. A bare install already takes 215 MB disk space. Add some swap and a few packages and your disk is full. Anything with serious dependencies simply fails to install, leaving a full filesystem behind. | |||
It runs very slow in default multi user, but it's reasonably fast in single user mode. So yeah, let's do everything as root all the time! I wrote my own startup script as a ghetto replacement for rc. | |||
== PPPoS, GL.iNet, SHA2017 badge and Pi0w == | |||
[[File:Compaq LTE 4-50E_powerbang_3.JPG|240px|thumb|right|pi0w with large 470µF cap connected to MAX3232 module]] | |||
I have three different PPP clients on the laptop right now. DOSPPP and Trumpet Winsock and pppd on BasicLinux. All of them work with pppd in OpenWRT on the [[GL-iNet]], after much fiddling around with settings and scripts everywhere. But there is one problem. The GL.iNet is way too powerful with 8x more RAM and CPU clockspeed. It's just... ''wrong''. So I decided to try the SHA2017 as my PPP-UART device. | |||
But this is a lot harder on the Badge. The Badge ESP-IDF runs has LwIP onboard. LwIP has some code from an old pppd inside somewhere. Parts of this code are available in the LwIP on the Badge, but some parts are not. I needed to hardcode the ip addresses in the code somewhere to make it possible to configure IP's in the tunnel. But the equivalents of the proxyarp and defaultroute options are broken. | |||
I can ping from Trumpet to the Badge, and from the Badge to the rest of the network, but not all the way in one go. ARP proxying is really needed. But it's unavailable in the code [https://github.com/espressif/esp-idf/blob/master/components/lwip/netif/ppp/ppp.c#L1052 right here] and in other places. | |||
The latest iteration of the wifi adapter is based on the Raspberry Pi Zero W (hereafter: pi0w), because it is smaller than a GL.iNet. This leaves room to build a new battery in the same bay. I used a brand new high-end UHS-I 16GB microSD card because that was the only thing I could find. Overkill, but hey. I had to add a big cap to make the 5V stable enough for the pi0w to not randomly reboot or loose wifi. Strange, since the GL.iNet and Badge did not have any issues with the exact same supply. | |||
The Pi actually generates the 3.3V to power the MAX3232 so it can output 3.3V signals and not kill the Pi, which could have happened if I left it powered directly from 5V as it was before with the GL.iNet. | |||
This basically means than I have decided not to try using the Badge anymore. I might still try other esp32 (or even esp8266) solutions in the future, many boards are small enough to fit in the same place. | |||
Latest revision as of 09:57, 13 August 2024
| Project Compaq LTE Elite 4/50E | |
|---|---|
| |
| I found a 1994 laptop, what can it still do? | |
| Status | In progress |
| Contact | Peetz0r |
| Last Update | 2024-08-13 |
I found this old laptop and I'm figuring out what to do with it. Fun fact: this laptop is almost exactly as old as I am.
First impression
Status when I found it
It had the (presumably) original harddrive still present and working (after 23 years!). On it was Windows 3.x with lots of Compaq bloatware and personal data of the previous owner. I decided to keep this as-is, because the original software/drivers/etc is hard to find/replace but I did not peek around very much because of privacy reasons. The battery was very much dead, the floppy drive did not work, and the bottom RAM cover was missing, but it did work just fine.
A service manual was easy to find online: Media:Compaq LTE Elite service manual.pdf (2.6 MB, 387 pages).
This web page was much harder to find: http://tuxmobil.org/compaq_lte475cx_en.html
Somehow the product page on HP.com is still alive: https://support.hp.com/nl-nl/product/compaq-lte-elite-notebook-pc-series/96327. (HP acquired Compaq in 2002, but the brand remained in use by HP until 2013.)
Specs
- 486 DX2 50 MHz
- 12 MB ram (4 MB onboard + 8 MB (came with 4 MB) on a proprietary expansion card)
- 250 MB harddisk
- 9,5" 640x480 monochrome TFT display
- 2-button PS/2 trackball
- PC speaker
- 2 empty PCMCIA slots
- 3,5" floppy drive (broken)
- 12V 2Ah NiMH battery (dead)
- no real soundcard
- no network hardware of any kind
Storage
The first thing I did was take out the original harddrive and go replace it with something else. I went to Aliexpress and got myself a IDE-CF adapter and a 2GB CF card. It could not boot from the card. I borrowed some more cards from another Revspacer and found out that cards up to 1GB work but larger cards do not. But since the original disk was 250 MB, I decided that 256MB would be enough. I ordered an "industrial" 256MB card and it has been working just fine so far. The original harddrive sits in a aluminium caddy, which is easily removable. That's great, since this is the only way to move files from/to this machine I'll have to use this rather often.
Floppy drive
The floppy drive does not work. It does make some noises but the disk never spins. The rubber belt inside was very much disintegrating, but replacing the belt did not result in a working drive yet. But even if it did, I have no other devices anywhere with a floppy drive anyway. WONTFIX. By the way, the drive is a Citizen W1D.
2024 update: I fixed it. See Compaq_LTE_Elite_4/50E#Floppy_emulator
Display
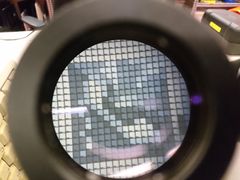
The monochrome screen is surprisingly good. The contrast is great, the resolution is... Very Good Anyway. The lack of subpixels makes it look very sharp. And there is no ghosting at all. I have seen early 90's laptops before where you could draw shapes by moving the mouse. Not this one. There is only one thing missing: color. But it's okay, there is a VGA port on the back, and there is plenty of color in there.
Sound
There is only a PC speaker inside. But it's a very loud one. Fortunately we get to change the volume trough Fn keys. It even has a graphical OSD regardless of OS (in textmode and some graphical modes)!
Modding!
BadgeBay™
Since the battery is completely dead, I removed it. We now have space to fit stuff in. This space is just wide enough to fit a SHA2017 Badge inside. No joke, it fits like a glove! Well, after some creative OpenSCAD and 3d-printing work that is. I printed many failed attempts in red PETG and just as it was about to run out I did my final print. So I inserted the green PETG in the bowden extruder while the red filament was still in the tube. They print at the same settings anyway, but the layer effect turned out very nice, by accident.
Serial port
I also ordered a bunch of MAX3232 boards and I had some CH340 ttl-serial-usb lying around. So I took one of both and connected them to my modern linux laptop at first. I could get a serial console, run ssh, and even revbank inside the Windows 3.1 Terminal app.
So I now needed a way to connect the Badge sitting in the battery bay to the serial port on the back of the laptop. Complete disassembly was required. I decided to make a second serial port parallel to the first port. This breaks when you connect devices to both ports, so don't do that then!. At first I connected it directly to a MAX3232 board, but than I decided to make it removable, just like the original battery. So I yanked a DE9 port from an old desktop board from the e-waste pile and soldered it in parallel to the rear port on a short ribbon cable, snipped away some plastic, added some padding and hotglue. We now have a internal DE9 serial port inside the battery bay BadgeBay™!
I only found out that the boards have a MAX3232 (not a MAX232) on board, which is a good thing. The MAX232 can only be powered from 5V and can only produce 5V out (the input is 3.3V tolerant). But the MAX3232 can be powered anywhere between 3.0V and 5.5V, and the logic output voltage will be that voltage as well. So, the MAX3232 is just a more flexible version of the MAX232.
During the disassembly process the fan connector broke off. But that's okay as you'll read in the next section.
+5V hackery
Up to this part, the Badge and the MAX3232 were powered from an external USB supply (mostly my modern laptop since I was flashing/debugging the Badge all the time anyway). But this wouldn't be good enough for a permanent setup. So I needed a way to connect Ground and +5V from the laptop to the badge. Ground was already present in the DE9 connector, so we are already halfway! But that's not enough. I needed a way to connect one extra pin reliably while keeping the carefully constructed hotpluggable toolless BadgeBay™ system intact. So i snipped one of the retaining screw thingies seperate from the shielding, connected a red wire, and then I hotglued a metal spring to the inside of the laptop. I soldered a red wire to the spring as well. I lined the spring up with the DE9 retaining screw.
Back to the broken fan connector. I spliced the wires from there and from the spring (and later another wire for the OPL2LPT) together and connected those to the pads behind the fan connector. We now have a BadgeBay™ +5V rail!
At this point the BadgeBay™ hardware was more or less working. A few weeks later I ordered my soundcards. The CVX4 does not need any external power, but the OPL2LPT does. It has a mini-usb connector to power it from a nearby USB port, which this laptop lacks. Powering it from any external source works fine but is clunky. The OPL2LPT kit already has pads for a DIY power header. Since the ground was already connected trough the pins in the port and/or shielding, I again only needed to worry about the +5V. So I added another red wire to my already existing splice near the fan connector and made this one long enough to reach all the way from there to the left side of the laptop, trough the PCMCIA cover, around the back, and into the OPL2LPT +5V header. But when not in use, this cable hides neatly behind the PCMCIA door.
-
One of the failed BadgeBay™ designs. The Hexagon grid on the bottom layer was too thin.
-
Serial - MAX3232 board - CH340 board - USB.
-
Revbank over serial console.
-
Bottomside of the mainboard.
-
First test with serial connected to my linux laptop.
-
Second test with the badge connected.
-
Badge in place in the BadgeBay™.
-
Springy +5V rail mechanism.
See also this video of the mechanism in action.
Parallel port soundcards
I did buy two different parallel port soundcards: a OPL2LPT (AdLib clone) and a CVX4 (Covox Speech Thing clone).
OPL2LPT
This is basically an AdLib re-implementation, together with an TSR "driver" that redirects data from the AdLib DMA address to the ParPort DMA address. Here is a YouTube video demonstrating how that looks. Fun fact, that laptop in that video is the high-end model of the same series as this one!
The OPL2LPT works perfectly fine, but the volume knob on the side was interfering with the PS/2 port. So I used grey ribbon cable and hotglue to change it and make it point upwards instead.
CVX4
This is basically a Covox Speech Thing clone, but less ugly. The output is a pure line level signal. It won't drive headphones and really needs an amplifier. But it works great when hooked up to the TV at the space. There are even Windows 3.11 drivers for it.
SBEMU and TEMU are old 1990's era drivers to partially emulate Sound Blaster or Tandy sound on the Covox Speech Thing. This depends on QEMM and does not work with EMM386. I haven't tried with QEMM yet.
New Battery? (obsolete)
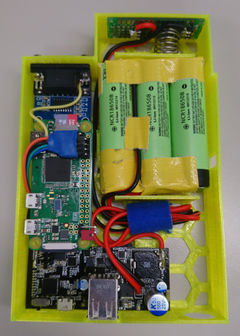
I have decided to replace the original battery with a modern version, based on the Muxtronics Powerbang with 3 18650 cells. This would be more than the capacity of the original battery in less than 1/3rd of the volume in cells. I can charge it using a micro usb port on the front. The Powerbang is programmable and does pretty accurate measurements.
Plans for the future:
- communicate between the pi0w and powerbang over serial (not interfering with pppos, requires either softserial or serial-usb over the OTG port)
- make a web interface to monitor power usage, compatible with ancient browsers
- upgrade to the USB-C PD version which mux might be working on
- maybe add a led battery indicator on the front
- improve usability of the front panel, maybe by making it thinner, and making the shape more like the laptop itself and less like a flat surface
No Battery!
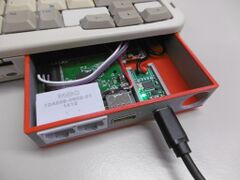
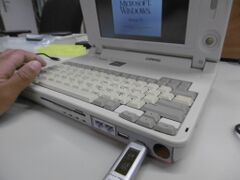
Over a year later, after doing some other projects involving USB type C and USB Power Delivery, I decided that this project needed to join the bunch. Also having another battery to keep charged in a project that is infrequently used is not ideal.
So I basically re-3d-modeled the battery bay replacement to have a small USB PD trigger module in the front. This also leaves enough space to have the GL.iNet in the front panel too (I got rid of the pi0w, it was unreliable as fuck). Also printed it on the Prusa in 2 colors because why not (all early 2018 printing was done on the Ultimaker).
Memory upgrade
I ordered a 8 MB ram module from ebay, and it works. So it now has 12 MB total memory. I am still looking for a 16 or 24 MB module.
Note to self: possibly useful keywords
- "Kingston KTC-ELITE"
- 3.3V
- 70ns
- 4 MB orig p/n: 199013-001 spare p/n: 194188-001
- 8 MB orig p/n: 199014-001 spare p/n: 194189-001
- 16 MB orig p/n: 196806-001 spare p/n: 196799-001
From the manual: "NOTE: Some early memory expansion boards for the Concerto Family of Personal Computers (option kit numbers 144790-001 and 144790-002) operate at 80 ns and do not function properly when installed in the Compaq LTE Elite Family of Personal Computers, which operate at 70 ns. Use only Compaq LTE Elite memory expansion boards (Table 3-2)." So yeah, watch out for timing. Also, voltages.
Also, let's not do what AkBKukU did.
Floppy emulator
Someone made a floppy drive emulator for it!
- Video: https://www.youtube.com/watch?v=6x54SSQnMsc
- Github repo: https://github.com/silvervest/OpenFlops-W1D
- Store: https://silvestrons-bits-and-bytes.square.site/product/openflops-w1d-floppy-drive-emulator/6
Software
The manual lists this as being preinstalled:
- MS-DOS and Microsoft Windows
- TabWorks utility (alternative to Program Manager)
- Computer Setup, Computer Checkup, Power Management, and Security Management utilities
- Automatic PCMCIA configuration utilities for MS-DOS and Windows
- Windows-based online documentation
- Plug and Play BIOS
- MS-DOS- and Windows-based shutdown capability (for closing out applications and turning off computer)
- Microsoft Video for Windows Runtime Version
- Adaptec 6360 SCSI drivers
- Universal Netware Client for simplified setup of a Netware network
- Intel Ethernet drivers and TI Token Ring drivers for networks other than Netware
- Western Digital WIN graphics drivers
- Logitech Trackball drivers
This is a rather long list. My clean install of Dos 6.22 and Windows 3.11 (NOT for workgroups!) works, but is missing some drivers, most notably graphics drivers. It does 640x480 16 colors out of the box, but it can do 1024x768 256 colors with the WS24A2 drivers. Also, the BIOS does not have it's own UI like any modern BIOS, you need tpo configure it with a specific Compaq tool.
SoftPaq

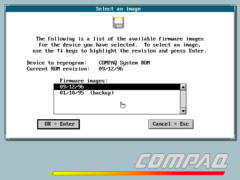
Somewhere on a dusty corner of ftp.hp.com all the original drivers and firmware and other stuff is still there in the form of SoftPaq's. Those are numered items, consisting of usually a .txt and a .exe file, where the .exe is a program that self-extracts and wrtes to a diskette. The only way to make this work is to run this in qemu, write to virtual diskettes, and copy all the stuff to directories on the CF card which had MS DOS and Windows. Some of the stuff are just installers for drivers, but some are supposed to be bootable. These things are just DOS programs packaged with a specific DOS variant, but they also run on normal MS DOS. In one case I had to disable EMM386 to upgrade the bios, but it worked just fine.
| number | Download | Original name | Date | My own description |
|---|---|---|---|---|
| SP1246 | .txt .exe | Portable Computer Setup for Windows | 1995-06-12 | Windows 3.1 tool to change Bios settings |
| SP1247 | .txt .exe | Win 3.1 Display Support for Elite & Contura 400 | 1995-06-12 | Windows drivers (and display setup utility) for the Western Digital WD24A2 |
| SP1250 | .txt .exe | Compaq PCMCIA Support | 1995-06-12 | I don't need or use any PCMCIA cards, but one of the other SoftPaq's required a file which is in here |
| SP1585 | .txt .exe | Portables Windows Supplemental Programs Diskette (PWSPD) | 1996-05-17 | This is a bunch of software, some of which is bloatware but some of it is useful utilities. It allows you to set the location of the on screen display but it also resets your wallpaper to a tiled monochrome Compaq logo. |
| SP2054 | .txt .exe | Computer Setup and Diagnostics for Portables | 1996-11-06 | This creates 2 diskettes, one with a bootable setup tool (almost the same as the one in SP1246) and another one with a diagnostics tool (whish does not work... yet). |
| SP2341 | .txt .exe | LTE Elite System ROM (12 Sep 1996) | 1996-11-19 | I updated my BIOS from 1995-01-10 to 1996-09-12, in 2018! It saved a backup on the "diskette" (which is the CF card of which I have images on my modern laptop). |
DOS 6.22
- 4DOS 8.00 (command.com replacement from FreeDOS with features such as tab completion)
- Arachne 1.97 (A graphical web browser which is almost a complete desktop environment)
- DilloDOS 3.02b (A port from Dillo for DOS. More info. Too bad it doesn't work yet.)
- DOOM (demo version)
- Wolfenstein 3D (demo version)
- Duke Nukem 3D (demo version)
- Transport Tycoon Deluxe (demo version)
- Pinball Fantasies (archive.org version, because of silly manual lookup copy protection. It's 2018 damnit!)
- AdLib Jukebox and AdLib Visual Composer
Windows 3.11
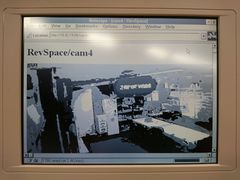
- Internet Explorer 3.0.1152
- Netscape Navigator 3.04
- Opera Browser 3.62
- mIRC 5.91
- WinZip 5.0
- WinSpeed 1.0 (just a silly benchmark to compare between this laptop, QEMU and DosBox)
BasicLinux 3.50
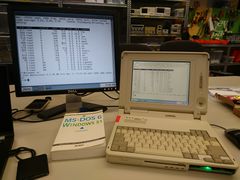
This is a linux distro from 2007 with a 2.2 kernel. It claims to require only 3MB ram but this is a lie: it kernel panicks when I try to boot it with only 4 MB present. It does not boot in QEMU or DosBox but it works and after some fiddling around even X works. For some reason only when I output to an external monitor only while running startx but after starting X it displays fine on either or both screens...?
Just like Windows 3.11, it boots from DOS, so I can now make a DOS startup menu and make this a triple boot system! I also resized the filesystem from the default 20MB to 64MB.
This was also the easiest OS to make PPP work. It's just plain pppd after all :)
DeLi(cate) linux 0.1 alpha5
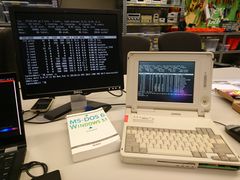
This is the most modern Linux that I am able to run. The kernel is 2.4.37 which is released in 2010. This specific kernel is compiled in 2013 and the image released in 2014.
NetBSD 7.1.2
This is probably the most modern OS that has some support for running on 8 MB ram. It has a GENERIC_TINY kernel config which is supposed to run on even 4 MB, and.... it panics. But that's okay, it works fine in 8 MB and it can run pppd and ssh to modern machines when it runs. A bare install already takes 215 MB disk space. Add some swap and a few packages and your disk is full. Anything with serious dependencies simply fails to install, leaving a full filesystem behind.
It runs very slow in default multi user, but it's reasonably fast in single user mode. So yeah, let's do everything as root all the time! I wrote my own startup script as a ghetto replacement for rc.
PPPoS, GL.iNet, SHA2017 badge and Pi0w
I have three different PPP clients on the laptop right now. DOSPPP and Trumpet Winsock and pppd on BasicLinux. All of them work with pppd in OpenWRT on the GL-iNet, after much fiddling around with settings and scripts everywhere. But there is one problem. The GL.iNet is way too powerful with 8x more RAM and CPU clockspeed. It's just... wrong. So I decided to try the SHA2017 as my PPP-UART device.
But this is a lot harder on the Badge. The Badge ESP-IDF runs has LwIP onboard. LwIP has some code from an old pppd inside somewhere. Parts of this code are available in the LwIP on the Badge, but some parts are not. I needed to hardcode the ip addresses in the code somewhere to make it possible to configure IP's in the tunnel. But the equivalents of the proxyarp and defaultroute options are broken.
I can ping from Trumpet to the Badge, and from the Badge to the rest of the network, but not all the way in one go. ARP proxying is really needed. But it's unavailable in the code right here and in other places.
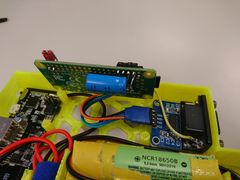
The latest iteration of the wifi adapter is based on the Raspberry Pi Zero W (hereafter: pi0w), because it is smaller than a GL.iNet. This leaves room to build a new battery in the same bay. I used a brand new high-end UHS-I 16GB microSD card because that was the only thing I could find. Overkill, but hey. I had to add a big cap to make the 5V stable enough for the pi0w to not randomly reboot or loose wifi. Strange, since the GL.iNet and Badge did not have any issues with the exact same supply.
The Pi actually generates the 3.3V to power the MAX3232 so it can output 3.3V signals and not kill the Pi, which could have happened if I left it powered directly from 5V as it was before with the GL.iNet.
This basically means than I have decided not to try using the Badge anymore. I might still try other esp32 (or even esp8266) solutions in the future, many boards are small enough to fit in the same place.


