PeetR0ver
| Project PeetrR0ver | |
|---|---|
| |
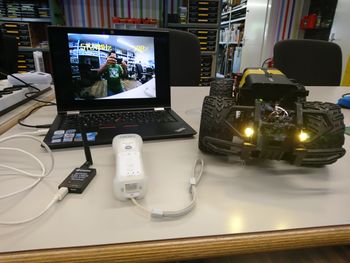
| I found an old RC car, and upgraded almost every component. | |
| Status | In progress |
| Contact | Peetz0r |
| Last Update | 2019-03-14 |
Status when I found it
The batteries were missing, but everything worked fine. The remote had an old HEMA rechargable 9v battery, but it was very much empty. The car itself came with a 9,6v 8 cell NiCad pack, but it was missing. It's a 27 MHz system with a telescoping antenna on the remote and a wire in a plastic tube on the car. It only has binary control, so it's either full speed or nothing. This makes it hard to control on smooth surfaces, including almost any indoor floor.
The car is still available at some stores around the world for around €40 - €50, such as http://www.stuntzolder.nl/monster-truck-rampage-1-12.html
The remote
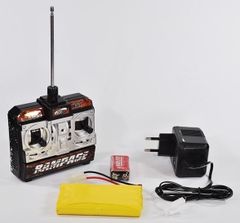
All of the tiny buttons are fake. It does not even have a power switch. The joysticks are also kinda fake. Each joystick is really just 2 buttons which you cannot press at the same time. It has an Silan TX-2B chip inside (the car has a matching RX-2B), and almost nothing else really. I modified the remote to have a micro USB port, so I could use it with a small USB power bank. It lasts forever and I never have to worry about batteries again. It runs fine on 5V.
A datasheet was easy to find online: TX-RX-2B.pdf (250 KB, 11 pages). Page 7 and 8 contain a schematic that almost exactly matches the remote and car. The biggest difference is the lack of a turbo button in my implementation. But that's okay. It goed fast enough as it is already. This datasheet is from 2005, but I have seen an almost identical datasheet of the Realtek TX2 and RX2 from 1998. For some unknown reason it's a Word document (336 KB, 8 pages).
The car
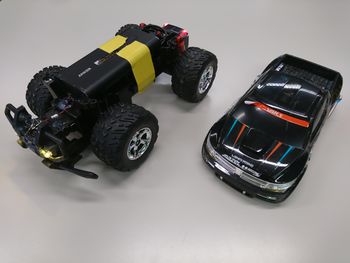
It's a "1:12 monster truck". Since the battery was missing, I had to find a way to get around 9V from something bigger than a 9V alkaline battery and less crappy than anything NiCad or NiMH. It's 2018 after all. I didn't feel like building my own Li-Ion pack, but I could have done that. Instead, I went for my big USB power bank which supports Power Delivery 2.0 and a ZY12PD module set to 9V, which I both happened to have already.
Inside the car is a large motor for driving which draws up to 3 A and a small motor for steering which draws around 500 mA. There is one PCB with the RX-2B chip and 2 H-bridge circuits.
I removed the body because it didn't fit well with the power bank. The body did have LED's, but I replaced those with more powerful LED's which I hotglued to the base. With almost 100 Wh of energy taped to it, the car worked practically forever. Presumably sligtly better than before, because the voltage does not drop when the battery drains like the original would have.
But this was not good enough. The controls are still limited to "1 bit resolution" and the range wasn't great.
Killing transistors
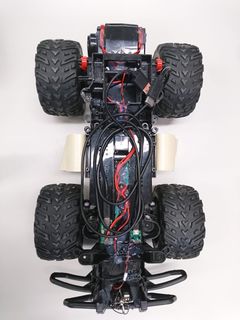
So, that was when I grabbed a NodeMCU esp8266 module from one of our parts boxes, wrote a bit of µPython to make it do PWM stuff on 4 pins, and connected those directly to the existing electronics in the car. It worked. I could connect to the repl over wifi and type forward(0.5) and it would move at half speed. So I played around with this for a few minutes until I accidentally turned on 'left' and 'right' at the same time. Shortly thereafter I learned what an H-bridge is and how transistors die. Luckily we have the same type of transistors in stock, so replacing one would be easy. But for some reason more transistors died. I have replaced all of them at least twice. I started debugging the board, but the only thing I could find out was that it would short out no matter what I tried.
The next morning another revspace participant gave me a motor driver module. This is based on the ST L298N chip, which has 2 integrated H-bridge circuits with protection against enabling both sides. I replaced all the electronics in the car with this board and the NodeMCU and called it a day.
Sofware
I decided to switch from µPython to C/Arduino. The software on the arduino listens for udp packets on port 42 with messages like 'forward 1023'. It also broadcasts a packets on port 4242 to facilitate autodetection.
On my laptop I used a USB gamepad with 2 analog sticks and I wrote a Python script with pygame to translate joystick events into udp packets. This works great, but I wanted something more portable, so I decided to make a mobile app with flutter. At first I implemented conteol using accelerometer input, but it's pretty hard to use that poperly, so I also implemented touchscreen control.
I have spent quite a lot of time to make it reliable (e.g. it does not continue to drive when you release the input device, even if the network is flaky and retransmitting old packets). The code is avaliable at https://gitlab.com/Peetz0r/PeetR0ver. Sorry for not including the early history in git :(
I also found a wiimote on the freestuff (sometime last year) and made my python code work with it, using wiimote-pad.
Camera
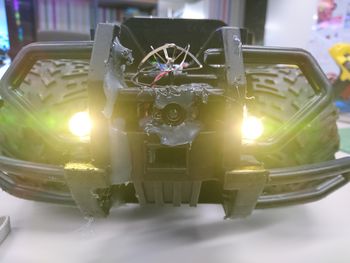
I wanted to see what I was doing even while driving out of sight. So I needed a camera. At first I experimented with streaming video from a smartphone to my laptop, but a phone is expensive and fragile and I couln't get the latency down to usable levels.
So I went analog. I bought a 5.8 ghz FPV camera and USB UVC reciever. Hotglued it into place and done! Really, I have spent much less time on the camera than any other part so far. I chopped of the supplied adapter cable and wired in a micro-usb breakout board, and that connects to another port on the same powerbank.
Trailer
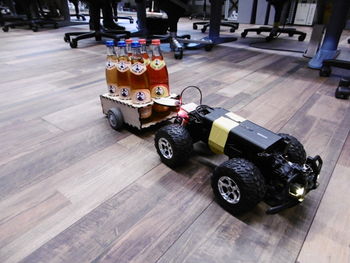
I decided that my car needed to become more useful. So I built a beverage trailer for it. The 'wood' is actually IKEA SLÄTTEN, which is actually 5,3 mm MDF with a nice fake wood pattern printed on it. I bought wheels at the DIY store nearby but they turned out to be way too small, and we had better wheels at the space, so I made a rev2. It it capable of carrying 6 full 500ml bottles of Club Mate, which are around 900g each, and the trailer itself is also around 900g. So the car can successfully carry over 6kg on top of it's own 2kg weight!