Gigaohmvoltmeter: Difference between revisions
Thomastheo (talk | contribs) No edit summary |
Thomastheo (talk | contribs) |
||
| Line 17: | Line 17: | ||
==Operating instructions== | ==Operating instructions== | ||
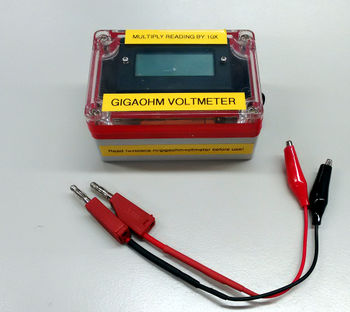
Connect circuit to meter with banana jacks. Turn on meter. Cross fingers. Multiply reading by 10 for actual voltage value. Keep in mind that the banana jacks (and cables) are most likely not rated for the voltages you are using them at, so suspend them off and away from conductive surfaces. Keep in mind that this is a high impedance device, and that whatever you are connecting it to is most likely also a high impedance circuit; Long cables can couple in a lot of noise. To minimize this problem I cobbled together a | Connect circuit to meter with banana jacks. Turn on meter. Cross fingers. Multiply reading by 10 for actual voltage value. Keep in mind that the banana jacks (and cables) are most likely not rated for the voltages you are using them at, so suspend them off and away from conductive surfaces. Keep in mind that this is a high impedance device, and that whatever you are connecting it to is most likely also a high impedance circuit; Long cables can couple in a lot of noise. To minimize this problem I cobbled together a pair of really short banana-crocodile cables. | ||
==Why== | ==Why== | ||
Revision as of 19:49, 21 December 2017
| Project Gigaohm Voltmeter | |
|---|---|

| |
| High impedance voltmeter | |
| Status | Completed |
| Contact | thomas |
| Last Update | 2017-12-21 |
Important Safety Information
This meter is only designed to be used for measuring very low current moderate to high voltage supplies. There is no input protection whatsoever other than the gigaohm resistor, which is rated for a maximum of 1500VDC. The banana jacks are not meant for high-voltage high-current applications. The isolation is not adequate for safe operation with power supplies capable of delivering anything more than a tickle's worth of current.
What's in the box
This is nothing more than a resistive divider and a high impedance voltmeter. The divider consists of a Dale 1 gigaohm 1.5kv 1% tolerance resistor, and a regular anonymous 100K carbon resistor. Crashjuh supplied a Dynatek 200 millivolt 200 megaohm input impedance panel meter, which is connected across the 100k resistor. Because of the 200mV range, the reading shown on the display does need to be multiplied by 10x.
Operating instructions
Connect circuit to meter with banana jacks. Turn on meter. Cross fingers. Multiply reading by 10 for actual voltage value. Keep in mind that the banana jacks (and cables) are most likely not rated for the voltages you are using them at, so suspend them off and away from conductive surfaces. Keep in mind that this is a high impedance device, and that whatever you are connecting it to is most likely also a high impedance circuit; Long cables can couple in a lot of noise. To minimize this problem I cobbled together a pair of really short banana-crocodile cables.
Why
This voltmeter is useful for measuring DC voltages without loading down the circuit under test. The input impedance of a regular multimeter can sometimes be too much of a burden for circuits incapable of delivering sufficient current to maintain voltage while taking a reading. Thanks to the gigaohm input impedance, this meter draws only 1 nanoamp per volt from the circuit under test. That is sufficiently low to allow measurement of voltage across a geiger tube while it is operating, which happens to be the primary reason for building the thing in the first place.
Can I open it?
No. There is a gigaohm resistor inside, and it does not like finger grease, Mate spray, or sideways glances. The battery should last forever, provided you turn it off after use.
It doesn't work
Put it on my Samla (thomas), and let me know. Thanks!