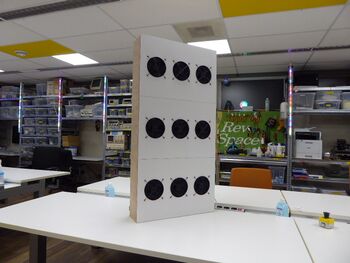
GhettoBlast
| Project GhettoBlast | |
|---|---|

| |
| DIY air purifier based on HEPA filter from Smart Air Blast. | |
| Status | In progress |
| Contact | Juerd |
| Last Update | 2024-01-20 |
-
Frame
-
Wiring the fans for first test
-
CADR test setup (door closed of course), front panels still taped
-
CADR test setup: aerosol generator and the blobs it makes :)
-
Front
-
Back
Why
We have two big air purifiers at RevSpace: one for the main space, one for the kitchen. Both are the Blast Mk II from Smart Air, which was the ideal device (at least when we bought these in 2022), in terms of CADR, noise, and CADR/€. And maybe even more importantly: you can switch them on/off with a simple external relay, in our case a Zigbee socket switch, so we can automatically turn them off when the space is closed, and on when the space opens again. Most air purifiers require pressing one or more buttons after a power outage.
Unfortunately, our lounge has negligible ventilation and no air purifier. That means opening a window to curb the spread of respiratory disease. Open windows are nice in summer, but way too cold when it's freezing outside.
The lounge is much smaller than the other rooms in the space, and as such gets fewer occupants, so it could do with a less powerful air purifier than the other rooms. HEPA filters are expensive and can't be recycled, but that doesn't have to mean sending them to incinerator or landfill when their capacity degrades. They can be reused for smaller rooms!
What
An air purifier is just a filter and a fan and making one is a nice 10 minute DIY project. Or 20 hours, depending on how you decide to design it.
GhettoBlast is not a sound system, it's an air purifier! Basically, a wooden box to house a (used) Blast HEPA filter and some PC fans. It uses PC fans because they're silent, efficient, and easy to buy. Unlike the real Blast, GhettoBlast has the fans on the clean side of the HEPA filter. That will likely result in a lower CADR, but also more durably clean fans and internal wiring.
BOM
- 1x (used) Blast HEPA filter
- Plywood:
- 2x 1200x150x15
- 2x 570x150x15
- 2x 1170x75x15
- 4x 540x75x15
- 4x 600x30x15
- Screws
- Glue (I used polymer caulk)
- 9x fan
- MDF panels with cutouts for the fans
- 12 V, 1.5 A power supply (uses 1 A when the fans are on)
Cost without the filter: ~150 €
Get some quality plywood, not "powerplex". I've lost many hours dealing with the wood that has spots so soft that it won't hold screw threads.
How
The filter is a bit more than 75 mm, but that includes foam that compresses to make a seal. The filter rests on the inner frame of 75 mm wide slats that are screwed and glued to a 150 mm wide outer frame. Some extra strips on the fan side for stability, some extra strips on the rear to keep the filter in place and compressed.
Build log
- 2024-01-11/12: built frame
- 2024-01-12/13: lasercut front plates, attached fans, tested, measured CADR
- 2024-01-13/14: added fan gaskets and grills, glued front plates
- 2024-01-16: final wiring and assembly (for now at least)
To do:
- Find a location and a method to mount to wall or ceiling.
- Make/buy a fan controller with RPM warning to alert if a fan fails. MQTT?
Regrets
Cheap plywood was a big mistake. It's ugly and keeps causing a lot of extra work when it's too soft to hold a screw, when it de-laminates, or just because it's crooked. Should have gone with MDF or fancy plywood instead.
Originally, I wanted to set the inner frame back 4 mm and expose a 15 mm border of plywood around it with the front plates set back 1 mm and then caulked to cover the remaining 1 mm gap, but when I saw how ugly this cheap plywood was, I decided that it would be better to cover the sides of the plywood completely. I now regret changing the plan, because the plywood ("PowerPlex") is not just ugly, it's also crooked and it was impossible to make a frame with straight edges. The laser cut front plates are very straight, though. The original plan would have been less ugly than this.
The PWM controller turns out to be unnecessary. Full speed is the only speed that makes sense: even downregulating the speed a bit causes a massive drop in air flow. I'm guessing that's a static pressure thing.
I didn't know cable glands are nylon; the attempt to glue it into the frame failed completely.
Limitations
Lower CADR
The setup as described, with 9 fans has a much lower CADR than an original Blast. Using a >5800 h used filter reduces the CADR further, and there's an additional penalty for putting the fans on the clean side of the filter.
However, the target for the lounge, based on the WHO recommended minimum ventilation rate of 36 m³/h/person and the 9 seats that the lounge has, is only 324 m³/h. It would be nice to reach the ASHRAE 241 standard for offices (from this table, 1 L/s/p = 36 m³/h/p), at 54 m³/h/person = 486 m³/h, but since the lounge is typically used by fewer people, less is acceptable for the intended purpose. (The higher ASHRAE 241 rates of >>100 m³/h/p seem unrealistic and pretty much unattainable for any densely occupied space.)
The obvious way to increase the CADR for this purifier is to increase the number of fans.
9 fans = 9 SPOFs
If any of the fans gives up the ghost, that will kill much more than 1/9 of the air flow, as the remaining fans will draw a lot of air in through the now defunct fan instead of through the filter.
No pre-filter
The HEPA filter will get loaded faster, because GhettoBlast does not have a pre-filter for coarse particles.
Clean Air Delivery Rate (CADR)
Estimated: 380 m³/h
The air flow is approximately 800 m³/h, based on the surface area of the folded filter (53 × 113 cm = 0.5989 m²) multiplied by the average of several anemometer readings (0.37 m/s). Based on on the facter of 0.475 between the original Blast's 2000 m³/h airflow and 950 m³/h CADR, that would give an estimated CADR of 0.485 × (1.13 × .53 × .37 * 3600) = 380 m³/h.
Measured: ~430 m³/h
You can measure the CADR if you have some tools. We have Snuffelaars and Grafiekjes so this shouldn't be too hard! I've estimated the lounge at 24 m² × 2.9 m - 3 m³ = 66.6 m³ = 2352 ft³ and plugged that into the calculations.
Since we don't have a compressor nebulizer to create a salt aerosol, I used the smoke of completely melting 1 meter of Stannol Fairtin Kristall 611 ø 0.7 mm SAC305 solder at 350 °C, until it doesn't smoke much anymore :)
The test procedure used is not quite as rigorous as suggested in the tutorial, and was done without an extra fan in the room:
- Disable all space ventilation
- Put blanket to cover slit under door (outside)
- Close door
- Don respirator
- Take soldering iron from holder, wipe clean
- Wait for temperature to stabilize
- Slowly melt the prepared length of solder into a blob
- Keep heating it until there's noticeably less smoke
- Open door slightly
- Leave room
- Close door
- Make sure blanket still covers gap
Not sure if it matters, but the tests were done at 17 °C, 32% RH, 1026 hPa.
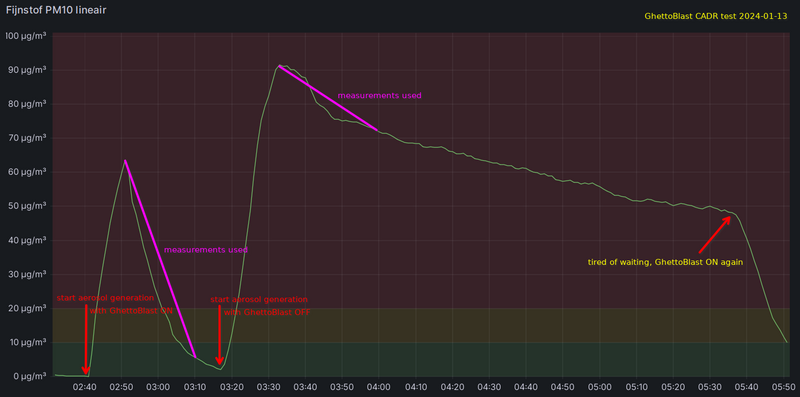
Using the 1-minute averages from the Grafana graphs, the PM1.0 smoke CADR is 430 m³/h, and the PM10.0 smoke CADR is 470 m³/h based on the first 20% of the downwards slope of the natural removal test.
   PM10: 2352 * (log(63.7/6.4)/18 - log(91.6/73.9)/23) * 1.7 = 473 m3/h
   PM1:  2352 * (log(63.7/6.4)/18 - log(42.9/34.0)/12) * 1.7 = 432 m3/h
Because these tests take a very long time, I did only one test, instead of taking the average of three tests as suggested.
Comparison table
| Metric | Blast Mk II | GhettoBlast | Difference |
|---|---|---|---|
| Fans | 1 | 9 | +8 |
| Speed settings | 3 | 1 | -2 |
| Tested with | new filter | old filter | >5800 h (Blast MK II) |
| Airflow | 2000 m³/h | 800 m³/h | -60% |
| CADR | 950 m³/h | 430 m³/h | -55% |
| Cost without filter | 850 € | 150 € | -82% |
| CADR per € | 1.12 m³/h | 2.87 m³/h | +156% |
| Power consumption | 140 W | 15 W | -89% |
| CADR per W | 6.79 m³/h | 28.67 m³/h | +322% |
| Noise at 1 m | 50 dB(A) | 45 dB(A) | -68% (acoustic) -30% (perceived) |
| Weight | 30 kg | 15 kg | -50% |
| Dimensions | 57.3 × 33 × 123 cm | 60 × 16.8 × 120 cm | -48% (volume) |
| Aesthetics | nice | ugly | yes |
| Assembly time | none | ~20 hours | +Inf |


