Arduino walker: Difference between revisions
Created page with " {{Project |Name= ArduinoWalker |Status=In progress |Contact= Semafoor }} ==Context== This project is started to get something tangible to do with an Arduino. As I..." |
No edit summary |
||
| Line 9: | Line 9: | ||
*Get started with Arduino | *Get started with Arduino | ||
*Impress a 2 1/2 year old boy with a robot | *Impress a 2 1/2 year old boy with a robot | ||
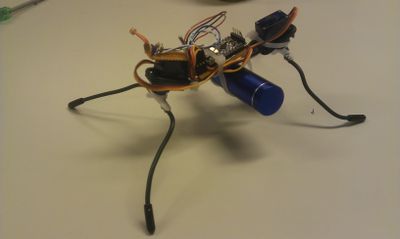
[[File:ArduinoWalker.jpg|thumb|right|400px|Arduino Walker]] | |||
==Miller two-motor walker== | ==Miller two-motor walker== | ||
Revision as of 22:36, 13 May 2014
| Project ArduinoWalker | |
|---|---|
| Status | In progress |
| Contact | Semafoor |
| Last Update | 2014-05-13 |
Context
This project is started to get something tangible to do with an Arduino. As I am completely new to Arduino and only fumbled around with a Basic Stamp some 5 years ago, I wanted to get started with an Arduino Pro Mini clone from the ElectronicaComponentenAutomaat. Main goals:
- Get started with Arduino
- Impress a 2 1/2 year old boy with a robot

Miller two-motor walker
Based on the Andrew Miller walker, it consists of two mini servo's that each control two legs. The Arduino controls the servo's through the servo library. The one-chip logic controller from the Miller design is left out completely.
To add a little more fun, a voltage devider consisting of two LDR's is added. The stroke of the rear legs is adjusted depending on the voltage and gives the walker a slight photophilic behaviour. I say slightly as the walker has a turning radius of several meters.
To Do
Build an assembly out of 50PCS Photoresistor GL5537 LDR Photo Resistors Light-Dependent NEW to give an illusion of bug eyes. Probably, only a couple of LDR's will be used on either side.