Sensor-data-bridge: Difference between revisions
No edit summary |
|||
| (One intermediate revision by the same user not shown) | |||
| Line 23: | Line 23: | ||
* Forwards measurement data to https://sensor.community | * Forwards measurement data to https://sensor.community | ||
* Forwards measurement data to https://opensensemap.org, you can configure the opensense-id by adding a device attribute in TheThingsNetwork console | * Forwards measurement data to https://opensensemap.org, you can configure the opensense-id by adding a device attribute in TheThingsNetwork console | ||
* Forwards measurement data to https://cayenne.mydevices.com, you configure the username/password/clientid by adding a device attribute in TheThingsNetwork console | * -Forwards measurement data to https://cayenne.mydevices.com, you configure the username/password/clientid by adding a device attribute in TheThingsNetwork console- | ||
* Supports Cayenne payload format for the data encoding, a custom payload format for SPS30 data (includes particle counts) | * Supports Cayenne payload format for the data encoding, a custom payload format for SPS30 data (includes particle counts) | ||
* Supports JSON payload format for the data encoding, you can specify in the config file which JSON fields are used | * Supports JSON payload format for the data encoding, you can specify in the config file which JSON fields are used | ||
* Handles particulate matter data (PM10, PM4.0, PM2.5, PM1.0), temperature, humidity, barometric pressure | * Handles particulate matter data (PM10, PM4.0, PM2.5, PM1.0), temperature, humidity, barometric pressure | ||
* Handles sound/noise data (LA EQ, and min/max value) | * Handles sound/noise data (LA EQ, and min/max value) | ||
* Can be run as a systemd service, so it automatically restarts in case the software would crash | * Can be run as a systemd service, so it automatically restarts in case the software would crash, server is restarted, etc | ||
=== Next steps === | === Next steps === | ||
* add support for geolocation through a scan of surrounding WiFi access-points and a geolocation service (google, mozilla) | * add support for geolocation through a scan of surrounding WiFi access-points and a geolocation service (google, mozilla) | ||
* add support for NB-IOT modem with t-mobile backend, see my [[Sim7020]] project | * add support for NB-IOT modem with t-mobile backend, see my [[Sim7020]] project | ||
* add support for other backends, e.g. feinstaub-app? | * add support for other backends, e.g. feinstaub-app? | ||
| Line 38: | Line 38: | ||
You need the following: | You need the following: | ||
* a server that is always on and connected to the internet, can be Linux or Windows | * a server that is always on and connected to the internet, can be Linux or Windows | ||
* a Java installation (<b>JDK</b> to compile), at least version | * a Java installation (<b>JDK</b> to compile), at least version 17 | ||
* some configuration on TheThingsNetwork side | * some configuration on TheThingsNetwork side | ||
* some configuration of my application (YAML file) | * some configuration of my application (YAML file) | ||
== Compilation == | == Compilation == | ||
(not needed if you use the docker image) | |||
To compile the software: | To compile the software: | ||
* clone the software from my github archive | * clone the software from my github archive | ||
| Line 60: | Line 61: | ||
== Installation == | == Installation == | ||
=== run as docker/podman container === | |||
How to run in docker/podman: | |||
=== run as docker container === | * Install docker and docker-compose and add your user account to the 'docker' group (Linux): | ||
sudo apt install docker-ce docker-compose | |||
sudo usermod -aG docker <username> | |||
* Get the code from github: | |||
git clone https://github.com/bertrik/sensor-data-bridge | |||
* Enter the 'docker' directory and pull the docker image from github: | |||
cd sensor-data-bridge | |||
cd docker | |||
docker-compose pull | |||
* Edit the config files with your own settings: | |||
vi sensor-data-bridge.yaml | |||
(or use nano, gedit, whatever) | |||
* Start the container: | |||
docker-compose up | |||
=== installation from raw tar === | === installation from raw tar === | ||
| Line 167: | Line 179: | ||
== Development == | == Development == | ||
== Forwarding noise data == | == Forwarding noise data == | ||
Latest revision as of 22:17, 10 March 2024
| Project sensor-data-bridge | |
|---|---|

| |
| Collects sensor data, forwards it to sensor.community/opensense/etc | |
| Status | Completed |
| Contact | bertrik |
| Last Update | 2024-03-10 |
What is this
This is a companion project of LoraWanDustSensor.
It takes airborne particulate matter measurement data transferred through TheThingsNetwork and forwards it to online databases:
- http://sensor.community (formerly Luftdaten),
- http://opensensemap.org and
https://cayenne.mydevices.com
Project on Github: https://github.com/bertrik/sensor-data-bridge
Unofficial sensor.community API documentation: https://api-sensor-community.bessarabov.com/
Features
- Picks up particulate matter measurement data received through TheThingsNetwork, using their "v3" infrastructure
- Forwards measurement data to https://sensor.community
- Forwards measurement data to https://opensensemap.org, you can configure the opensense-id by adding a device attribute in TheThingsNetwork console
- -Forwards measurement data to https://cayenne.mydevices.com, you configure the username/password/clientid by adding a device attribute in TheThingsNetwork console-
- Supports Cayenne payload format for the data encoding, a custom payload format for SPS30 data (includes particle counts)
- Supports JSON payload format for the data encoding, you can specify in the config file which JSON fields are used
- Handles particulate matter data (PM10, PM4.0, PM2.5, PM1.0), temperature, humidity, barometric pressure
- Handles sound/noise data (LA EQ, and min/max value)
- Can be run as a systemd service, so it automatically restarts in case the software would crash, server is restarted, etc
Next steps
- add support for geolocation through a scan of surrounding WiFi access-points and a geolocation service (google, mozilla)
- add support for NB-IOT modem with t-mobile backend, see my Sim7020 project
- add support for other backends, e.g. feinstaub-app?
Requirements
You need the following:
- a server that is always on and connected to the internet, can be Linux or Windows
- a Java installation (JDK to compile), at least version 17
- some configuration on TheThingsNetwork side
- some configuration of my application (YAML file)
Compilation
(not needed if you use the docker image) To compile the software:
- clone the software from my github archive
git clone https://github.com/bertrik/sensor-data-bridge.git
- enter the application directory
cd sensor-data-bridge
- run the gradle script to build the software (Linux):
./gradlew assemble
or (Windows):
gradlew assemble
- the application zip & tar is now available in sensor-data-bridge/sensor-data-bridge/build/distributions
To update to the latest version:
- Update software from github archive:
git pull
- perform the last two steps above again
Installation
run as docker/podman container
How to run in docker/podman:
- Install docker and docker-compose and add your user account to the 'docker' group (Linux):
 sudo apt install docker-ce docker-compose
 sudo usermod -aG docker <username>
- Get the code from github:
git clone https://github.com/bertrik/sensor-data-bridge
- Enter the 'docker' directory and pull the docker image from github:
 cd sensor-data-bridge
 cd docker
 docker-compose pull
- Edit the config files with your own settings:
 vi sensor-data-bridge.yaml
 (or use nano, gedit, whatever)
- Start the container:
docker-compose up
installation from raw tar
Unzip the distribution file somewhere on your system. I put it in my home directory, for example
 cd
 tar xvf code/sensor-data-bridge/sensor-data-bridge/build/distributions/sensor-data-bridge.tar
Configuration
Node configuration
The particulate matter measurement device needs to send data in the Cayenne format. I used the following conventions:
- PM10 is encoded as analog value on channel 1
- PM2.5 is encoded as analog value on channel 2
- PM1.0 is encoded as analog value on channel 0 (optional)
- PM4.0 is encoded as analog value on channel 4 (optional)
- Temperature is encoded using standard Cayenne encoding (optional)
- Humidity is encoded using standard Cayenne encoding (optional)
- Barometric pressure is encoded using standard Cayenne encoding (optional)
The SPS30 produces mass concentration data in 4 categories, particle count in 5 categories, plus particle size. Format:
- 16-bit (big endian) PM1.0 mass concentration (unit 0.1)
- 16-bit (big endian) PM2.5 mass concentration (unit 0.1)
- 16-bit (big endian) PM4.0 mass concentration (unit 0.1)
- 16-bit (big endian) PM10 mass concentration (unit 0.1)
- 16-bit (big endian) PM0.5 number concentration (unit 1)
- 16-bit (big endian) PM1.0 number concentration (unit 1)
- 16-bit (big endian) PM2.5 number concentration (unit 1)
- 16-bit (big endian) PM4.0 number concentration (unit 1)
- 16-bit (big endian) PM10 number concentration (unit 1)
- 16-bit (big endian) typical particle size (unit nm)
A total of 20 bytes. This is sent on LoRaWAN port 30. Temperature and humidity is not encoded.
In case your node uses a payload decoder in the TTN console, you can configure the sensor-data-bridge with the name of the JSON property:
- 'path' is a pointer inside the decoded JSON payload that contains the value, e.g. "lc/avg"
- 'item' is an internal id in the sensor-data-bridge, e.g. "PM10", see https://github.com/bertrik/sensor-data-bridge/blob/master/sensor-data-bridge/src/main/java/nl/bertriksikken/pm/ESensorItem.java
TheThingsNetwork application/device configuration

You need to define an 'application' on TheTheThingsNetwork.
- Go the TTN console: https://console.cloud.thethings.network/ and log in
- You need an 'application', create a new one, or use an existing one
- Within the application you need a 'device', so create a new one, or use an existing one:
- Use OTAA, LoRaMac version 1.0.3
- Enter the device EUI as displayed on the display
- Use the application keys as specified in my LoraWanDustSensor page
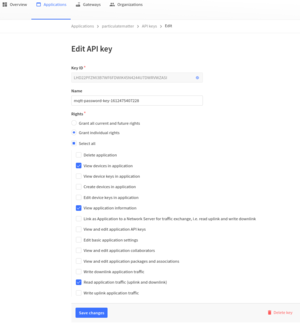
- You need an API key
- Create this on the TTN console, grant individual rights as shown in the screenshot
- NOTE: you have only one chance to copy this key somewhere, so copy/paste it locally to a text file or something
Configuration
To configure the application:
- Start the application without a configuration file, this will create a default template, stop the application again
 cd sensor-data-bridge
 bin/sensor-data-bridge
 (ctrl-C)
- Edit the configuration YAML file, example:
---
ttn:
  mqtt_url: "tcp://eu1.cloud.thethings.network"
  identity_server_url: "https://eu1.cloud.thethings.network"
  identity_server_timeout: 20
  apps:
  - name: "particulatematter"
    key: "NNSXS......."
    encoding: "CAYENNE"
senscom:
  url: "https://api.sensor.community"
  timeout: 20
opensense:
  url: "https://api.opensensemap.org"
  timeout: 20
So:
- enter the name of your application
- enter the TTN API key you saved earlier
- other defaults are probably OK
Sensor.community
TODO
- Go to https://devices.sensor.community/ and log in
- Register a node with id 'TTN-<device-EUI-as-shown-on-display>' (without the spaces or hyphens, e.g. 'TTN-0000547AF1BF713C')
- Register it with the proper configuration, e.g. SDS011 with BME280
- In the TTN console, add a device attribute with name 'senscom-id' and value 'TTN-<device-EUI-as-shown-on-display>'
Opensensemap
- Go to opensensemap.org and log in
- Create an opensense node with the proper configuration
- Copy the opensensenmap 'box id', a long hexadecimal string
- Go the TTN console: https://console.cloud.thethings.network/ and log in
- Add an attribute for the device, under 'General settings', name = 'opensense-id', value = boxid that you copied from opensensemap.org
- The mapping from TTN-id to boxid is refreshed by the forwarder once an hour, so within an hour the forwarding to opensensemap.org starts
Development
Forwarding noise data
How it is encoded in the sensor.community firmware:
- Three values are sent in the JSON to sensor.community:
- "noise_LAeq", value in dB(A)
- "noise_LA_min", value in dB(A)
- "noise_LA_max", value in dB(A)
Values are read from the noise sensor as follows:
- call to dnms_calculate_leq()
- call to dnms_read_data_ready(&data_ready) returns 0 if OK and (data_ready != 0)
- call to dnms_read_leq(&dnms_values) returns 0 if OK
- firmware applies a "correction" by adding a fixed offset
Measurement values are encoded as 32-bit units, interpreted as 32-bit floats.
References:
- DNMS is read at https://github.com/opendata-stuttgart/sensors-software/blob/beta/airrohr-firmware/airrohr-firmware.ino#L3392
- DNMS is formatted in the JSON at https://github.com/opendata-stuttgart/sensors-software/blob/beta/airrohr-firmware/airrohr-firmware.ino#L3405
- DNMS I2C code is at https://github.com/opendata-stuttgart/sensors-software/blob/beta/airrohr-firmware/dnms_i2c.cpp