Glu-MCU: Difference between revisions
No edit summary |
No edit summary |
||
| Line 49: | Line 49: | ||
upload_command = pymcuprog write -d $BOARD_MCU -t uart -u $UPLOAD_PORT -f $SOURCE --erase --verify | upload_command = pymcuprog write -d $BOARD_MCU -t uart -u $UPLOAD_PORT -f $SOURCE --erase --verify | ||
</code> | </code> | ||
Then upload your project. | |||
It will show some errors in files. In the file "core_devices.h" replace line 419 with: #elif (PROGMEM_SIZE == 0x20000 && (defined(__AVR_DA__) || defined(__AVR_DB__))) || (PROGMEM_SIZE == 0x10000 && (defined(__AVR_DD__) || defined(__AVR_DU__))) | |||
In the file "wiring_analog.h" replace line 72 with: if (!(pin == ADC_DAC0 || pin == ADC_GROUND || pin == ADC_TEMPERATURE || pin == ADC_DACREF0 || pin == ADC_VDDDIV10 || pin == ADC_VDDIO2DIV10)) | |||
Now try to upload again, it should succeed. | |||
Revision as of 00:20, 26 September 2022
| Project Glu-MCU | |
|---|---|

| |
| General purpose MCU board with the AVR64DD32 controller | |
| Status | In progress |
| Contact | Glu |
| Last Update | 2022-09-26 |
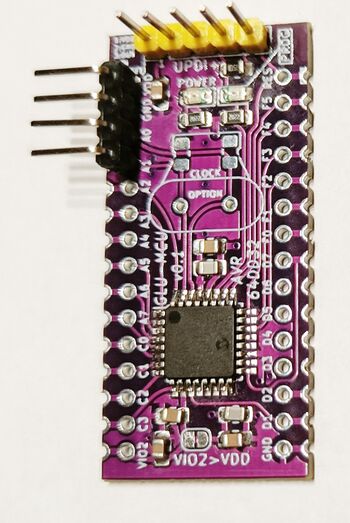
I use the Glu-MCU as a better replacement for Arduino pro mini boards
The Atmega328 or Atmega32U4 boards nowadays are either hard to get or expensive. And the microcontroller is kinda old.
That's why I decided to make a nice and simple alternative board with the much more powerful AVR64DD32 microcontroller.
There is not much on this board, only the necessities. For programming the UPDI is broken out on the top of the PCB. There is a resistor on the PCB as well so you can connect it directly to any TTL USB serial converter. For programming connect VDD to 3,3V or 5V, GND to GND, OUT to the Rx and IN to the Tx of the serial converter. pymcuprog can program the device in a few seconds.
On the photo I already connected a 4 pin header to VDD, GND, A0 and A1, I use it for debugging via serial. The pin A0 is the standard Tx pin and A1 is the standard Rx pin of USART0.
Programming
For programming I've used platformio. Install the following platforms Atmel AVR and Atmel megaAVR. When starting a new project, use the AVR64DD32 board.
Change the platformio.ini file
- PlatformIO Project Configuration File
- Build options
- build flags, source filter
- Upload options
- custom upload port, speed and extra flags
- Library options
- dependencies, extra library storages
- Advanced options
- extra scripting
- Please visit documentation for the other options and examples
- https://docs.platformio.org/page/projectconf.html
[env:AVR64DD32]
platform = atmelmegaavr
board = AVR64DD32
framework = arduino
- Everything from here is NOT auto-generated
upload_protocol = custom
upload_port = /dev/ttyUSB0 # Define this yourself, for some reason when upload_protocol = custom, $UPLOAD_PORT does not get defined automatically, no clue why
- Wipe and write .hex using pymcuprog
upload_command = pymcuprog write -d $BOARD_MCU -t uart -u $UPLOAD_PORT -f $SOURCE --erase --verify
Then upload your project.
It will show some errors in files. In the file "core_devices.h" replace line 419 with: #elif (PROGMEM_SIZE == 0x20000 && (defined(__AVR_DA__) || defined(__AVR_DB__))) || (PROGMEM_SIZE == 0x10000 && (defined(__AVR_DD__) || defined(__AVR_DU__)))
In the file "wiring_analog.h" replace line 72 with: if (!(pin == ADC_DAC0 || pin == ADC_GROUND || pin == ADC_TEMPERATURE || pin == ADC_DACREF0 || pin == ADC_VDDDIV10 || pin == ADC_VDDIO2DIV10))
Now try to upload again, it should succeed.