STM32: Difference between revisions
mNo edit summary |
m (Remove erase, it's not needed) |
||
| Line 80: | Line 80: | ||
* use the stm32flash utility to disable the flash-read protection | * use the stm32flash utility to disable the flash-read protection | ||
<pre>./stm32flash /dev/ttyUSB0 -k</pre> | <pre>./stm32flash /dev/ttyUSB0 -k</pre> | ||
== Software == | == Software == | ||
Revision as of 00:30, 27 November 2016
| Project STM32 | |
|---|---|

| |
| STM32 setup guide | |
| Status | In progress |
| Contact | bertrik |
| Last Update | 2016-11-27 |
Introduction
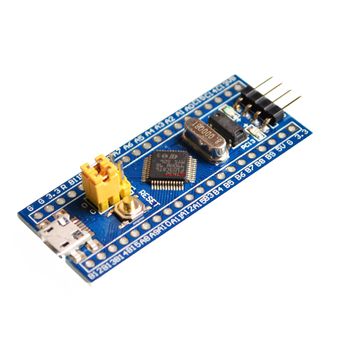
This page is about inexpensive microcontroller boards containing an STM32 processor and how to get them to work.
You can find these boards on AliExpress for less than E2,- if you search for "stm32f103c8t6". Yet they have nice specifications, see also http://www.st.com/en/microcontrollers/stm32f103c8.html
To name a few:
- 32-bit ARM Cortex-M3 processor running at up to 72 MHz
- 128 kB flash memory, 20 kB SRAM
- USB and CAN controllers
- 32 kHz crystal for RTC
- dual 1 us A/D converter, DMA controller
- the usual stuff like SPI, UART, I2C
They are even Arduino compatible, see:
- Arduino for STM32
- Arduino goes STM32, a quick tutorial
- Arduino STM32 page of Roger Clark
Another, very similar, guide to getting started with STM32 and Arduino.
Setting up the tool chain
This describes the steps I did to get a "blue pill" board to work on Debian Jessie.
Arduino IDE
Steps to set up the IDE:
- get and install the latest Arduino IDE from here.
- under menu Tools / Board / Board Manager, search for "zero" and install the Arduino Zero toolchain
- get the Arduino_STM32 source code, for example, run in the console:
cd ~/code
mkdir stm32
cd stm32
git clone https://github.com/rogerclarkmelbourne/Arduino_STM32
- create a symlink to the Arduino_STM32 source tree in your ~/Arduino/hardware directory, for example:
cd ~/Arduino/hardware
ln -s ~/code/stm32/Arduino_STM32 .
- restart the Arduino IDE.
stm32flash
If you're running a 64-bit Linux, it can be convenient to add support for the 32-bit stm32flash utility, run:
sudo apt-get install libc6-i386
The tool chain installation should now be ready.
Hardware
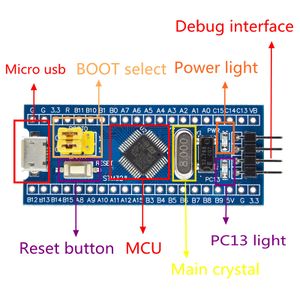
The hardware I'm using, is the blue pill, I soldered on the headers for easy plugging with dupont-wire. You'll also need a USB-serial converter.
I hooked it up as follows:
- converter 5V -> board 5V
- converter GND -> board GND
- converter RXD -> board A9
- converter TXD -> board A10
To put the board into programming mode, set the BOOT0 jumper to the "1" position and the BOOT1 jumper to the "0" position, then push the reset button.
To just run the program that was last flashed into the board, set both the BOOT0 and the BOOT1 jumper to the "0" position.
Unlocking/erasing the first time
You might find that the flash is protected on a new board, this means you cannot put your own program on the board. You can fix this as follows:
- go the stm32flash directory
cd ~/Arduino/hardware/Arduino_STM32/tools/linux/stm32flash
- use the stm32flash utility to disable the flash-read protection
./stm32flash /dev/ttyUSB0 -k
Software
To load your application:
- make sure you have the BOOT jumpers in the right position and press the reset button
- in the Arduino IDE, under menu Tools / Board, select "Generic STM32F103C Series"
- in the Arduino IDE, under menu Tools / Upload Method, select "Serial"
- use the following program to blink the on-board LED:
#define pinLED PC13

void setup() {
  pinMode(pinLED, OUTPUT);
}

void loop() {
  digitalWrite(pinLED, HIGH);
  delay(200);
  digitalWrite(pinLED, LOW);
  delay(100);
}
- ctrl-U to upload it to the board, the program will start automatically
- to make the program run after a reboot, place the BOOT0 jumper back to its original position.
The Arduino console should show something like this:
Sketch uses 7,140 bytes (5%) of program storage space. Maximum is 131,072 bytes.
Global variables use 1,984 bytes of dynamic memory.
/home/bertrik/Arduino/hardware/Arduino_STM32/tools/linux/serial_upload ttyUSB0 {upload.altID} {upload.usbID} /tmp/arduino_build_33274/stm32.ino.bin
stm32flash Arduino_STM32_0.9

http://github.com/rogerclarkmelbourne/arduino_stm32

Using Parser : Raw BINARY
Interface serial_posix: 230400 8E1
Version      : 0x22
Option 1     : 0x00
Option 2     : 0x00
Device ID    : 0x0410 (Medium-density)
- RAM        : 20KiB  (512b reserved by bootloader)
- Flash      : 128KiB (sector size: 4x1024)
- Option RAM : 16b
- System RAM : 2KiB
Write to memory
Erasing memory

Wrote address 0x08000100 (3.59%)
Wrote address 0x08000200 (7.17%)
...
Wrote address 0x08001be4 (100.00%) Done.

Starting execution at address 0x08000000... done.
