ZigbeeCoordinator
| Project ZigbeeCoordinator | |
|---|---|

| |
| Flashing a CC2531 USB dongle with Zigbee coordinator firmware | |
| Status | Completed |
| Contact | bertrik |
| Last Update | 2019-03-14 |
What is it
This page describes the steps I performed to flash a generic CC2531 USB stick with firmware to make it act as a Zigbee coordinator. Zigbee is a wireless protocol to communicate with wireless appliances in your home, for example Ikea TRADFRI lamps.
Stuff to investigate:
- Can we run the CCLib flash programming proxy on an STM32 microcontroller? It has 3.3V voltage levels, uses a fast (virtual) serial port, so flashing should be faster than with a Wemos D1.
-> at least it compiles easily with platformio!
- Is it possible to combine the data-in/data-out pins on the Arduino programming software? This would remove the need for connecting data-in/data-out together on a breadboard
Hardware and updating the firmware
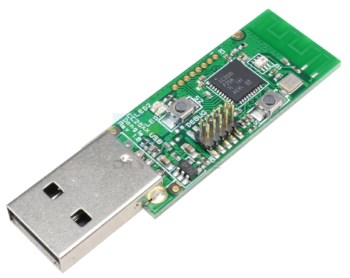
I ordered this CC2531 stick plus the debug connector.
By default, the stick shows up in the system log as follows:
 [58101.234023] usb 1-3: New USB device found, idVendor=0451, idProduct=16ae, bcdDevice= 1.17
 [58101.234030] usb 1-3: New USB device strings: Mfr=1, Product=2, SerialNumber=0
 [58101.234033] usb 1-3: Product: CC2531 USB Dongle
 [58101.234037] usb 1-3: Manufacturer: Texas Instruments
It was connected to an ESP8266 Wemos D1 mini for re-programming.
I followed these instructions.
I wired this up as follows:
- press the flatcable onto the stick, with the red wire away from the USB connector
- press the flatcable onto the programming adapter, with the red wire towards pin 1
Wiring up:
- Wemos D1 pin GND -> breadboard -> adapter GND (pin 1)
- Wemos D1 pin D8 -> breadboard -> adapter RESETn (pin 7)
- Wemos D1 pin D7 -> breadboard -> adapter DC (pin 3)
- Wemos D1 pin D6 -> breadboard -> adapter DD (pin 4)
- Wemos D1 pin D5 -> breadboard connected to D6!
I downloaded the CCLib toolchain from GitHub and made the following changes:
diff --git a/Arduino/CCLib/Examples/CCLib_proxy/CCLib_proxy.ino b/Arduino/CCLib/Examples/CCLib_proxy/CCLib_proxy.ino
index 1ba6949..b47d4da 100644
--- a/Arduino/CCLib/Examples/CCLib_proxy/CCLib_proxy.ino
+++ b/Arduino/CCLib/Examples/CCLib_proxy/CCLib_proxy.ino
@@ -35,10 +35,10 @@
 ////////////////////////////////////////

 // Pinout configuration (Configured for Arduino Leonardo)
-int CC_RST   = 5;
-int CC_DC    = 4;
-int CC_DD_I  = 3;
-int CC_DD_O  = 2;
+int CC_RST   = D8;
+int CC_DC    = D7;
+int CC_DD_I  = D6;
+int CC_DD_O  = D5;

 // Change this if you are using an external led
 int LED      = LED_BUILTIN;
Then enter the CCLib/Python directory and try to see if the programming tool can find the USB stick (the -E argument proved critical for me, it wouldn't find the stick without it):
./cc_info.py -E
If it's found, you should see all kinds of information about the CC2531.
TODO document:
- download the HEX file
- edit the HEX file
- command to program the HEX file
- ask for patience
NOTE: Performing auto-detection (use -p to specify port manually)
INFO: Checking /dev/ttyUSB0
INFO: Found a CC2531 chip on /dev/ttyUSB0

Chip information:
      Chip ID : 0xb524
   Flash size : 256 Kb
    Page size : 2 Kb
    SRAM size : 8 Kb
          USB : Yes
Sections in /home/bertrik/code/zigbee2mqtt/temp/CC2531ZNP-Prod.hex:

 Addr.    Size
-------- -------------
 0x0000   8176 B
 0x1ff6   10 B
 0x3fff0   1 B
 0x2000   239616 B

This is going to ERASE and REPROGRAM the chip. Are you sure? <y/N>:  y

Flashing:
 - Chip erase...
 - Flashing 4 memory blocks...
 -> 0x0000 : 8176 bytes
    Progress 100%... OK
 -> 0x1ff6 : 10 bytes
    Progress 100%... OK
 -> 0x3fff0 : 1 bytes
    Progress 100%... OK
 -> 0x2000 : 239616 bytes
    Progress 100%... OK

Completed
After flashing, the USB stick shows up as follows in the system log:
[64730.568699] usb 1-3: New USB device found, idVendor=0451, idProduct=16a8, bcdDevice= 0.09
[64730.568706] usb 1-3: New USB device strings: Mfr=1, Product=2, SerialNumber=3
[64730.568710] usb 1-3: Product: TI CC2531 USB CDC
[64730.568714] usb 1-3: Manufacturer: Texas Instruments
[64730.568717] usb 1-3: SerialNumber: __0X00124B0014B943EA
[64730.593932] cdc_acm 1-3:1.0: ttyACM0: USB ACM device
[64730.595428] usbcore: registered new interface driver cdc_acm
[64730.595434] cdc_acm: USB Abstract Control Model driver for USB modems and ISDN adapters
Software
Zigbee2mqtt
Zigbee2mqtt talks to the Zigbee CC2530/2531 stick and bridges Zigbee events from devices to MQTT and vice vera.
This means you can get input from a device by subscribing to an MQTT topic. You can control a device by publishing to an MQTT topic.
On top of this, you can run home assistant or domoticz to get a fancy GUI.
Run:
npm start
Examples
Turn the lamp on and off (with fade) over MQTT:
 mosquitto_pub -h stofradar.nl -t zigbee2mqtt/0x000b57fffe441844/set -m {\"state\":\"ON\"}
 mosquitto_pub -h stofradar.nl -t zigbee2mqtt/0x000b57fffe441844/set -m {\"state\":\"OFF\"}
Change the brightness (0-255):
 mosquitto_pub -h stofradar.nl -t zigbee2mqtt/0x000b57fffe441844/set -m {\"brightness\":1}
 mosquitto_pub -h stofradar.nl -t zigbee2mqtt/0x000b57fffe441844/set -m {\"brightness\":10}
 mosquitto_pub -h stofradar.nl -t zigbee2mqtt/0x000b57fffe441844/set -m {\"brightness\":255}
Change the color temperature (250-454, blueish-reddish) over MQTT:
 mosquitto_pub -h stofradar.nl -t zigbee2mqtt/0x000b57fffe441844/set -m {\"color_temp\":250}
 mosquitto_pub -h stofradar.nl -t zigbee2mqtt/0x000b57fffe441844/set -m {\"color_temp\":454}
Home assistant
Couldn't make it work in Home Assistant.
I tried to run it on my laptop, but to see it in full glory, you apparently need to run it on a Raspberry Pi. It does run partially on a laptop but some parts are not available (like the Add-on Store), so you can't just use the zigbee2mqtt plugin.
I find this software a bit confusing, and don't want to spend much time figuring out if I need "Home Automation", "hass", "hass.io", installing a special version of docker, etc.
Domoticz
Can be run on a regular laptop with Debian.