Geodesic dome
| Project Geodesic dome | |
|---|---|

| |
| Status | In progress |
| Contact | User:Morphje |
| Last Update | 2016-03-08 |
Morphje is building a geodesic dome. This page houses all related information about this project.
Background
I've always wanted to build a geodesic dome. That's basically it. I positively enjoy the beautiful shape, it's geometrics and sturdiness using only basic materials. The round shape makes it an ideal candidate for high wind sites, since the drag coefficient is very low. For a 9.1 meter dome, the wind load is only 500 KG in a gale force wind (8 bft).
Project goals
At the hackerspace, bigger is better and when doing it's worth overdoing. The only thing i'm overdoing is it's size: 9.1 meter in diameter. All materials are chosen for lightweight, low cost, but still be able to carry my own weight.
- Total costs: <400 EUR
- Primary material: wood (pine 22x48 mm)
- Size: 9.1 meter
- Height: 3.7 meter (or 5.4m when extended to 5/9 3v)
- Type: 4/9 3v Krushke dome
Costs
Costs so far:
| Item | Notes | Cost (EUR) |
|---|---|---|
| Wooden struts | Pine; 22x48mm. hornbach, 60 3m60 lengths It's basicly strong enough to hold me, see pictures |
101 |
| Metal pipe inserts | 12mm CV pipe; galvanized; Installand 4 6m lengths This one was a gamble, but it paid out nicely |
29 |
| Metal end cap rings | 25x50x1.5 mm rectangular steel, cut into 10mm sections. 6m length This is used to strengthen the wood, so it won't split |
33 |
| nuts and bolts | m3; hornbach | 50(-ish tbd) |
| dogtail M6 bolts | m6; tbd dogtail bolts are awesome for assembly |
tbd |
| tarp | 70-ish/TBD | |
| Ratchet straps | 1500kg | 40-ish/TBD |
| Anchors | 30x30 square tubing | 30-ish/TBD |
| Paint | ||
Calculations
http://www.domerama.com/wp-content/uploads/2012/08/BL191104B-Geodesic-Analysis1.pdf
Stats
Days to build: 5 days (so far op 80/20 point) Cuts and brushes: too many to tell XD. At least one a day Sweat: too much (including complains from other hackerspace members) Hammerblows: 10000+ Drill bits destroyed: 5
Buildlog
Testing
Final conclusion: It works like a charm, full steam ahead!
Metal parts fabrication
There are 2 metal parts. A collar and a pipe.
The collar is used to prevent the wood from splitting. I procured square tubing 50x25x1.5mm, inner dimensions are 47x22, perfect for the wooden struts. There were cut on an industrial cut off saw. I can highly recommend using a decent machine and use plenty of cutting fluid! Cutting each collar takes about 30 seconds. Using a disc grinder will use more material (you cannot cut straight), go through a lot of discs (one disc will only cut 10 collars i reccon) and setting up each cut will take up more time.
alternative: 50kg dyneema kite rope. Wrap it around tight and fasten it like a hangman noose. Glue into place. Or use wet rope and wrap it around tight, when the rope dries it shrinks.
The pipe is cut, deburred, scored using a blunt chissel type of tool and then whacked flat on the anvil. It took me the better part of the day (10 hours including breaks and dinner) to finish these pipes. Whacking 265-ish pipes takes at least 5000 hammer blows and my shoulder was pretty sore the next day.
Alternative: use an arbour press, an electric hammer or any other means to crush the pipes. Do NOT use your vice, a vice is not made for repeated crushing action, although these are only 12mm pipes, you can find lots of examples on the web of people destroying their vices crushing pipes for domes. Be prepared to repair your vice when doing so. I've (pre-)crushed a couple of pipes, but ended up still whacking them on the anvil. When grinding, cutting, and working around our vice i ended up repairing it anyway, i guess i just gave it the final push and ended up repairing it. If and when i decide to create another dome i will definitely use a press of some kind :)
-
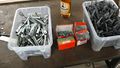 metal parts in different stages of production

Wooden struts assembly
-
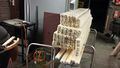 all the metal insert are fitted

Door
Tarp
-
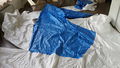 sewing of the tarp. This is the top piece

Anchors
Custom tools
Actual full build
Timelapse of the build
Dome in use
-
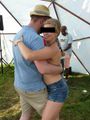 Dancing kizomba
 -
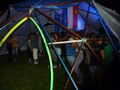 dancing kizomba at night

