EspNowSkip
| Project EspNowSkip | |
|---|---|

| |
| Music skip button based on ESP-Now protocol | |
| Status | Completed |
| Contact | bertrik, jelly |
| Last Update | 2019-07-30 |
Usage
Press the button to skip to the next song, or start playing when nothing was playing yet.
Usage:
- short press (like 0.5 second) to skip to the next song in the playlist; if no song was playing a new playlist is automatically created and started
- long press (like 5 seconds) to pair the skip button to the skip receiver; this is normally a one-time procedure
The principle of operation is that the skip button (ESP8266) sends an ESP-Now packet to the skip receiver (ESP32 SHA badge), the skip receiver forwards it to the revspace MQTT, yet another script then performs the actual skip on the audio system.
Introduction
This page is about using the ESP8266/ESP32 ESP-Now protocol in the music skip button.
A music skip button has some tricky requirements:
- you want it to react reasonably quickly, with little latency between pressing the button and skipping to the next song
- the skip button should be mobile, so it is battery powered and has to be conservative with current
The reason to explore the ESP-Now route, is because the existing skip button implementations have some serious disadvantages:
- we used to have a wireless infrastructure based on NRF24L01+ modules, this was never really reliable and it got more complicated with incompatible fakes appearing on the market
- we have a WiFi-based skip button, but it's online continuously, drawing way too much power to make it mobile (so it's tethered to a 5V charger)
The ESP-Now protocol is connection-less, you don't need to set up a session/get an ip-address to communicate between nodes. This saves time and battery power, exactly what we need.
The current ESP-Now skip button prototype needs only about 200 ms after powering up to send a message.
Hardware

The hardware is based on ESP8266 (featuring the ESP-Now mode), in particular a Wemos D1 mini board, they are cheap, small and easy to find. A Wemos D1 mini board has an onboard regulator with typically much lower quiescent current than the similar NodeMCU. Another candidate would be an ESP32, it also features the ESP-Now mode and is present on the SHA2017 badge, which is already a kind of mobile platform.
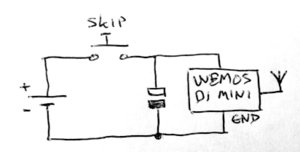
The way it's wired up, is to make the actual physical button just power up the board. In case a ESP-Now re-initialisation (which takes a bit more time) is needed, you just keep the button pressed for a bit longer to complete the initialization process. This way, the SKIP program starts executing as soon as you press the button and there is zero quiescent current drain on the battery.
Powering the ESP8266
A single lithium cell is probably the most convenient way of powering the ESP8266, w.r.t. size, voltage, availability.
We can wire up the battery in two ways:
- Battery power to the 5V input. The 5V power path contains a voltage regulator to create 3.3V for the ESP8266. When the battery is full (say 4.2V), this appears to work fine. But when the battery voltage gets a little lower, this becomes problematic.
- Battery power to the 3.3V input. A Lithium battery can go up to 4.25V in voltage, that's out of range (too high) for the ESP8266 (specified for 2.5V-3.6V).
The solution used in the skip button is to simply put an 1N4148 diode in series with the battery and connect it to the 3.3V rail. This drops the voltage from the battery by about 0.6 volt, from 3.3-4.2V to 2.7V-3.6V.
Battery life
The aim is to power the skip button with a 18650 lithium battery.
The deep sleep current of the Wemos D1 mini has been measured at about 0.16 mA. So in deep-sleep, the battery should last > 10000 hours. Battery self discharge current is estimated at 20% per year. For a 2000 mAh battery, that is equivalent to about 400 mAh/8765h = 45 uA, about 1/3rd of the deep sleep current of a wemos d1 mini.
Suppose a skip takes 480 ms consuming a current of 150 mA on average. That's 0.02 mAh per skip, so an 18650 mAh battery with a capacity of 2000 mAh can perform up to 100000 skips.
Software
Source code
Source code can be found here https://github.com/bertrik/EspNowSkip
It contains the following programs:
- skipbutton.ino: an Arduino program running on the button part (slave, on an ESP8266) which sends the skip message
- skipreceiver.ino: an Arduino program running on the receiver part (master, on an ESP32) which receives the skip message
- nomzknop.ino: an Arduino program running on an ESP8266 capable of sending the 'NOMZ' message
EspNowSkip protocol
It works like this:
- there are two roles:
- a single central "master" node
- one or more "slave" skip-buttons
- when the skip button is pressed, the ESP8266 starts up, reads the last known ESP-Now channel and master MAC address from EEPROM and sends an ESP now packet
- if the skip button doesn't receive an ACK from the master node, it starts a discovery procedure to re-establish the channel and MAC address of the central node
- the central node is configured as an AP with a specific name (e.g. "espnow-revspace")
- the discovery procedure tries to find the central node by doing an AP scan, the AP name is the only thing that needs to be agreed upon in advance between master and slave code
- in the list of the APs, the slave node finds the SSID belonging to the central node, then it also knows the wifi channel and MAC address of the central node
- the slave node stores both wifi channel and MAC address in (emulated) EEPROM and goes back to sleep
The data we send over ESP-now is an MQTT-like topic and message, separated by a space, for example
revspace/button/skip jump_fwd
The "jump_fwd" command is the literal command as used in the Squeezeplayer JSON-RPC protocol.
The master node simply parses this into two parts (split on the first space) and bridges this to the Revspace MQTT infrastructure.
Audio system protocol
There are apparently several ways to send a command to our music playback systems. Two of these are briefly described below, we currently use the second method.
Classic HTTP GET
Our audio system skips to the next song in the playlist using an HTTP GET with the following path:
/Classic/status_header.html?p0=...&p1=...&p2=...&player=...
where
 p0 is "playlist"
 p1 is "jump"
 p2 is "%2B1", or "+1" escaped
 player is "d8%3Ad3%3A85%3A17%3A30%3A9c", or "d8:d3:85:17:30:9c" escaped, which is the unique id of the particular player instance
Example:
http://jukebox:9000/Classic/status_header.html?p0=playlist&p1=jump&p2=%2B1&player=b8%3A27%3Aeb%3Aba%3Abc%3Ad5
JSON Protocol
To skip to the next song in the play list, on the jukebox audio player software, send a HTTP POST to:
http://jukebox.space.revspace.nl:9000/jsonrpc.js
with content
{"id":1,"method":"slim.request","params":["be:e0:e6:04:46:38",["button","jump_fwd"]]}
Expect a result like:
{"result":{},"params":["be:e0:e6:04:46:38",["button","jump_fwd"]],"method":"slim.request","id":1}
Nomz button
This button is located in the kitchen and can be used to indicate dinner readiness.
To use it, you press the button. A long press on the button allows the button to reconnect to the ESP now receiver, in case this connection was lost/forgotten.
It uses the ESP now protocol to send a message to the skip receiver. The skip receiver converts this into a MQTT message that triggers the NOMZ mechanism, lighting up the main room with a NOMZ indication.
The topic and the message that is sent is
revspace/button/nomz "lekker! "
(this was copied from the 'official' nomz button and includes a space character, I don't think there is a specification what this message should look like exactly).
This nomz button basically consists of an old 18650 cell, a momentary on-button and an ESP8266 nodemcu v2 in series. Pressing the button powers up the nodemcu, causes the ESP now message to be sent and finally stops executiion by entering deep sleep.
Multiple buttons modification

In its current form, the skip button can only skip.
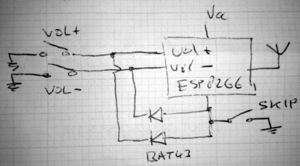
To get more functionality (e.g. volume up/down) the following could be done:
- add two more buttons, volume up and volume down
- when a volume button is pressed, it connects the positive battery terminal to a ESP8266 input pin
- also it powers up the ESP8266 by connecting the positive battery terminal to the ESP8266 Vcc (through a low-drop schottky diode, e.g. BAT43)
- the software is modified to check the input pin upon startup, if the pin is active, it performs the action for volume up/down, instead of the action for skip
- problem (?): the ESP8266 does not have a built-in pull-down, so the pin level is undefined when the button is not pressed -> perhaps add an external pull-down?
- alternatively, the pins do have a built-in pull-up, so we could perhaps wire it up so we switch the ground pin instead of the Vcc pin
Experiments
Timing
A successful exchange typically appears to take about 1 ms. A failed exchange (receiver down) typically appears to take from 8 ms to 12 ms.
Range check
The range was checked by letting an ESP8266 node send a packet and see if it arrived at the receiver node (placed left of the gereedschapsbord). Results:
- OK in all of the rooms of the space
- FAILs sometimes when sending from the binnenplaats
- FAILs sometimes in the stair case
- FAILs all of the time north-east of the building
- FAILs sometimes just outside the garage door
- OK when inside of the garage door
- OK in kitchen, lounge, klusruimte, werkplaats
References
- Read-the-docs about the low-level IDF ESP-Now API
- Harringay MakerSpace ESP-Now
- WifiEspNow project on github
- Our current WiFi-based skip button
Future
To do in the immediate future:
- put it in a nicer case (ceiling cavia watches you skip)
- fix issue in ESP now receiver that causes it to miss messages when two ESP now messages are sent in quick succession
- add more buttons besides just skipping!
More distant future:
- use ESP-Now also for other kinds of hacker space infrastructure where low-power consumption is important and/or a power wire is inconvenient: spark shack temperature for example -> basically this works already, see https://github.com/bertrik/espnowsensor
- send data back to the skip button, for example we could send a "now playing" message or album art back to a SHA2017 badge and have it shown on its e-ink display. Complication: there is no easy-to-use Arduino implementation of the e-ink display. Might be worth taking a look here
add a supercap to the skip button, to allow a short press (e.g. 100 ms) to also be registered -> I have various types in my Samla (e.g. 0.1F 5.5V)..Not needed.