DustSensor
| Project Dust Sensor | |
|---|---|

| |
| Experiments with a dust sensor | |
| Status | Completed |
| Contact | bertrik |
| Last Update | 2017-12-24 |
Introduction
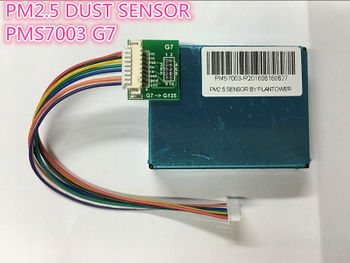
I ordered a dust sensor module to perform measurements of airborne dust. In particular, I ordered this one, the Plantower PMS 7003, AliExpress link. It's being advertised as an advanced generation of dust sensor (7th generation), while still reasonably priced (E15,-). It uses lasers to perform the measurement and I think it contains a small fan to move the air around.
Hardware
Data sheets can be found:
The module takes 5V to run and communicates using 3.3V levels.
It makes an estimate of the number of particles per size category, total 6 categories: 0.3-0.5-1.0-2.5-5.0-10 micrometer. It also gives an estimate of the total mass of the particles in 3 categories: PM1.0, PM2.5 and PM10.
I plan to connect this thing up using an ESP8266.
Software
The software archive can be found at github, code has been written but not tested on actual hardware yet. Typing 'make' builds and runs unit tests that verify parsing of measurement data and construction of command data. The sub-directory 'pms7003_esp' contains the .ino file to be opened in the Arduino IDE.
Libraries used:
- SoftwareSerial
- WiFiClient
- WiFiManager
- PubSubClient
This dust sensor outputs its data as a 32-byte serial data stream at 9600 bps.
I plan to run the sensor in 'passive' mode. This means it's not doing a measurement unless the software explicitly tells it do one measurement.
Protocol outgoing data
The protocol for measurement data from the module is that data is sent in frames. Each frame starts with specific begin marker bytes, then a length byte, then the actual data, and finally a checksum. I think it is a good match to use a simple finite state machine to parse the stream and get synchronized to the frames.
| Value | Meaning | Remark |
|---|---|---|
| 0x42 0x4D | Begin marker | ASCII for characters 'B' and 'M' |
| 0x00 0x1C | Length | Length of following data |
| XX YY | PM1.0 concentration (ug/m3) | CF=1, standard particles |
| XX YY | PM2.5 concentration (ug/m3) | CF=1, standard particles |
| XX YY | PM10 concentration (ug/m3) | CF=1, standard particles |
| XX YY | PM1.0 concentration (ug/m3) | in atmospheric environment |
| XX YY | PM2.5 concentration (ug/m3) | in atmospheric environment |
| XX YY | PM10 concentration (ug/m3) | in atmospheric environment |
| XX YY | Number of particles >0.3 um | in 0.1 liter air |
| XX YY | Number of particles >0.5 um | in 0.1 liter air |
| XX YY | Number of particles >1.0 um | in 0.1 liter air |
| XX YY | Number of particles >2.5 um | in 0.1 liter air |
| XX YY | Number of particles >5.0 um | in 0.1 liter air |
| XX YY | Number of particles >10 um | in 0.1 liter air |
| VV | Version number | ? |
| EE | Error code | ? |
| C1 C2 | Check code | basically the sum of all bytes up to the check code |
Data is encoded in big-endian format.
Protocol incoming data
This protocol allows commands to be sent to the module, also in frames. Each command frame consists of 7 bytes. It starts with two marker bytes, then a command byte, two data bytes and finally two checksum bytes.
| Value | Meaning | Remark |
|---|---|---|
| 0x42 0x4D | Begin marker | ASCII for characters 'B' and 'M' |
| CC | Command | 0xE1, 0xE2 or 0xE4 |
| HH LL | Data | Depends on command |
| C1 C2 | Check code | basically the sum of all bytes up to the check code |
References
List of dust sensors:
- list of sensors from "samen meten aan luchtkwaliteit".
- another overview of dust sensors.
Citizen science projects for measuring ultra fine dust:
- Dutch RIVM air quality measurement project
- Belgian project "ik adem" - fijnstofmetingen
- German project luftdaten - measure air data by yourself
Dust measurement blog:
Making graphs of dust data
To create nice graphs, I used the following stack of tools/applications:
- a dust sensor, as described here, that publishes measurement data towards an MQTT server
- an MQTT server to accept the data and forward it to subscribers
- the 'Telegraf' importer that listens on the MQTT stream and converts the data to influx database
- an influx database, to store the measurement data
- graphana, to grab the data from the database and display it
Sensor
An important thing to consider, is to omit the any unit from the measurement values in MQTT, so the published value can be parsed as an integer/float. So, use '10' instead of '10 ug/m3', for example.
Telegraf
Things I did:
- downloaded and installed the Telegraf .deb from here.
- generated a default configuration using:
telegraf --input-filter mqtt_consumer --output-filter influxdb config >telegraf.conf
- edited the configuration to set mqtt and influxdb settings
- influxdb output plugin
- urls = ["http://172.29.0.1:8086"]
- mqtt_consumer plugin
- topics=[ "bertrik/pms/#" ] (REALLY?)
- data_format="value"
- data_type="integer"
- influxdb output plugin
- test-run using 'telegraf <TODO>'
- copied the final telegraf.conf to /etc/telegraf and restarted the telegraf service
systemctl restart telegraf
Grafana
Add a data source, pointing to the influx DB. Provide credentials and verify by pressing the 'test connection' button.
Add a dashboard, add a row to the dashboard, add a graph panel to the row. Under 'metrics', add a query with the following properties:
- FROM mqtt_consumer WHERE topic = bertrik/pms7003/PM10
- SELECT field(value)
- GROUP BY
- ALIAS BY PM10
- repeat for other particle sizes (PM1.0 and PM2.5)