LoraWanNode: Difference between revisions
Define next steps |
Add arduino pin description |
||
| Line 38: | Line 38: | ||
* pin VCC to arduino Vcc pin (3.3V) | * pin VCC to arduino Vcc pin (3.3V) | ||
* pin GND to arduino Gnd pin | * pin GND to arduino Gnd pin | ||
* pin NSS to arduino pin D10 | * pin NSS to arduino pin D10 (SS) | ||
* pin SCK to arduino pin D13 | * pin SCK to arduino pin D13 (SCK) | ||
* pin MOSI to arduino pin D11 | * pin MOSI to arduino pin D11 (MOSI) | ||
* pin MISO to arduino pin D12 | * pin MISO to arduino pin D12 (MISO) | ||
* pin DIO0 to arduino pin D4 | * pin DIO0 to arduino pin D4 | ||
* pin DIO1 to arduino pin D5 | * pin DIO1 to arduino pin D5 | ||
Revision as of 20:59, 4 April 2016
| Project LoraWanNode | |
|---|---|

| |
| Description of how to set up an Arduino Pro Mini and an HopeRF RFM95 to create a LoraWAN node | |
| Status | Initializing |
| Contact | bertrik |
| Last Update | 2016-04-04 |
Introduction
This page describes the steps needed to create a simple LoraWAN node for the-things-network, using an Arduino Pro Mini and a HopeRF RFM95 module. It doesn't currently contain any new work, it just describes the steps I've done to use existing code to get a LoraWAN node to work with a LoraWAN network.
I've tested this successfully on the-things-network (TTN) in the city of Utrecht. The gateways picking up the signal from the node were approximately 1.5 km away.
Some of the messages received by the TTN: http://thethingsnetwork.org/api/v0/nodes/19740823
How to tell if it works
On the Arduino side, every time a packet has been successfully sent, you'll see a message containing "EV_TXCOMPLETE" on the serial output of the Arduino.
On the TTN side, you can go to http://thethingsnetwork.org/api/v0/nodes/YOUR_DEVICE_ID where you should see the content of the message you just sent, along with information about the particular gateway that received your signal, received signal strength and with what settings (bandwidth, spreading factor) your packet was received.
Next steps
Stuff to do after this:
- get a better idea of the messages exchanged in the LoraWAN protocol: log events in the onEvent() function, or log more communication with the radio
- actually attach a data source (like a sensor) to the node
- get a better idea of the performance, I'm getting the impression that RSSI was quite low and that a lot of my packets were not received by the network
Hardware
The hardware I've used is:
- a HopeRF RFM95 module
- an Arduino mini pro, 8MHz/3.3V
- a CP2104-based USB-serial converter
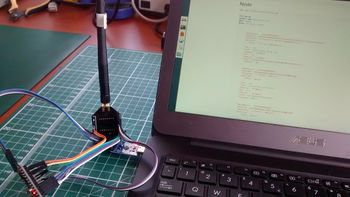
The HopeRF RFM95 module is connected to the Arduino using "dupont" wire, as follows:
- pin VCC to arduino Vcc pin (3.3V)
- pin GND to arduino Gnd pin
- pin NSS to arduino pin D10 (SS)
- pin SCK to arduino pin D13 (SCK)
- pin MOSI to arduino pin D11 (MOSI)
- pin MISO to arduino pin D12 (MISO)
- pin DIO0 to arduino pin D4
- pin DIO1 to arduino pin D5
- pin DIO2 to arduino pin D7
Basically this connects the RFM95 to the SPI bus of the Arduino, connects the RFM95 to 3.3V power and connects some of the generic RFM95 I/Os (like interrupt signals) to the Arduino. I don't know if connection of all the DIOx pins is really needed.
Software
Tools
- Arduino IDE 1.6.8, from https://www.arduino.cc/en/Main/Software
Libraries
I've used this LoRa LMIC library: https://github.com/things4u/LoRa-LMIC-1.51.git
Clone this library into ~/Arduino/libraries and restart the Arduino IDE
 cd ~/Arduino/libraries
 git clone https://github.com/things4u/LoRa-LMIC-1.51.git
Node firmware
The firmware used on the arduino is the nano-lmic-v1.51-F.ino from the examples directory of the LoRa LMIC library.
I had to make the following changes:
- in the library: replaced all instances of "arduino.h" to "Arduino.h" (capital "A")
- changed the device address (variable "DevAddr") in the .ino file to another number
- changed the payload string in function do_send in the .ino file
When running this code, you can see some debug messages coming in over the serial port at 115200 bps.