Esp32cam: Difference between revisions
From RevSpace
mNo edit summary |
|||
| Line 16: | Line 16: | ||
* [[bertrik]] ordered [https://aliexpress.com/item/ESP32-CAM/32947577882.html this board on AliExpress] | * [[bertrik]] ordered [https://aliexpress.com/item/ESP32-CAM/32947577882.html this board on AliExpress] | ||
To install the camera | To install the camera: | ||
* flip the black part of the camera connector 90 degrees so it points up | |||
* place the camera connector, contacts towards the PCB, camera facing up | |||
* gently slide the connector in place (about 2 or 3 mm of travel), e.g. pushing with the screw driver onto the rigid part of the camera connector towards the white part of the PCB connector | |||
* flip the black part of the connector back into the flat position. | |||
Pins (ESP32 cam to USB serial converter): | Pins (ESP32 cam to USB serial converter): | ||
Latest revision as of 14:49, 31 July 2021
| Project ESP32-CAM | |
|---|---|

| |
| Cheap webcams with Wifi, what could possibly go wrong? | |
| Status | In progress |
| Contact | noopwafel, bertrik |
| Last Update | 2021-07-31 |
Introduction
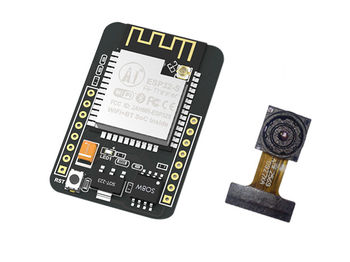
It's an ESP32 board with a camera, running a web server, so it acts as an inexpensive webcam.
Hardware
To install the camera:
- flip the black part of the camera connector 90 degrees so it points up
- place the camera connector, contacts towards the PCB, camera facing up
- gently slide the connector in place (about 2 or 3 mm of travel), e.g. pushing with the screw driver onto the rigid part of the camera connector towards the white part of the PCB connector
- flip the black part of the connector back into the flat position.
Pins (ESP32 cam to USB serial converter):
- ESP-32 5V to USB serial 5V
- ESP-32 GND to USB serial GND
- ESP-32 UAR to USB-serial TX
- ESP-32 UAT to USB-serial RX
- ESP-32 IO0 looped to ESP-32 GND (they are next to each other), you can use a jumper or a dupont wire. CLOSED for flashing, OPEN for running.
Software
- maybe https://github.com/m5stack/m5stack-cam-psram ?
- https://github.com/donny681/ESP32_CAMERA_QR
- Step by step video guide to getting it up and running with Arduino IDE and the Expressif CameraWebServer example
- https://github.com/geeksville/TenDollarWebcam
platformio
The CameraWebServer example can be compiled as a platformio project: https://github.com/bertrik/CameraWebServer
To build the code, clone the git repo above, cd into it, then type
pio run
To upload it to the board (put a jumper between IO0 and GND):
pio run -t upload
To watch the debug output (remove the jumper):
pio device monitor
Platformio can be installed on a Debian Linux system as follows:
 sudo apt install python-pip
 sudo pip install platformio
 pio upgrade