TuxDroidHacking: Difference between revisions
From RevSpace
Gábor Nyers (talk | contribs) No edit summary |
Gábor Nyers (talk | contribs) |
||
| (5 intermediate revisions by the same user not shown) | |||
| Line 18: | Line 18: | ||
</blockquote> | </blockquote> | ||
[[File:Tux_Droid_1.jpg|600px]] | [[File:Tux_Droid_1.jpg|600px]] | ||
<span id="challenge"></span> | |||
= Challenge = | |||
<span id="level-1-update-wireless-communication"></span> | |||
=== Level 1: Update wireless communication === | |||
# Leave the main board as it is | |||
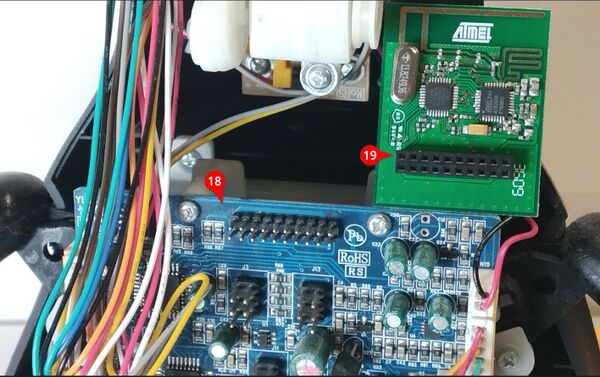
# Replace the wireless dautherboard (item 19) in de TuxDroid with a RPi Nano, ditch the Fish (item 2) | |||
<span id="level-2-replace-the-entire-guts"></span> | |||
=== Level 2: Replace the entire “guts” === | |||
# Keep the motors, cabling, sensors | |||
# Replace the mainboard (item 18) with modern motor control, replace the built-in battery (item 14) etc… | |||
<span id="level-3-whatever-tickles-your-fancy"></span> | |||
=== Level 3: Whatever tickles your fancy === | |||
# Interface Tux with ChatGPT and have it sing a lullabuy | |||
# ... | |||
<span id="interested"></span> | |||
== Interested? == | |||
'''Go ahead and play with the TuxDroid!''' | |||
You may: | |||
# Disassemble, but keep all bits and make sure it can be reassembled | |||
# Solder wires to experiment, but remove them when you’re done for the day | |||
<span id="tuxdroid-harware-overview"></span> | <span id="tuxdroid-harware-overview"></span> | ||
= TuxDroid harware overview = | = TuxDroid harware overview = | ||
Latest revision as of 17:58, 16 April 2024
| Project Tux Droid | |
|---|---|
| |
| Status | In progress |
| Contact | gny |
| Last Update | 2024-04-16 |
TuxDroid Introduction
from the Wikipedia page:
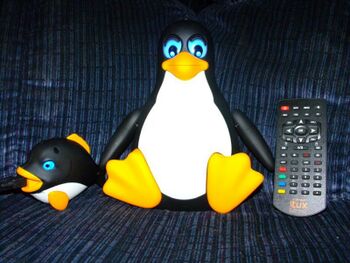
Tux Droid is a Linux wireless Tux mascot (210mm × 180mm × 140mm - with lowered wings) with a programmable interface, allowing it to announce events by its gestures and by ALSA driven sound.
Challenge
Level 1: Update wireless communication
- Leave the main board as it is
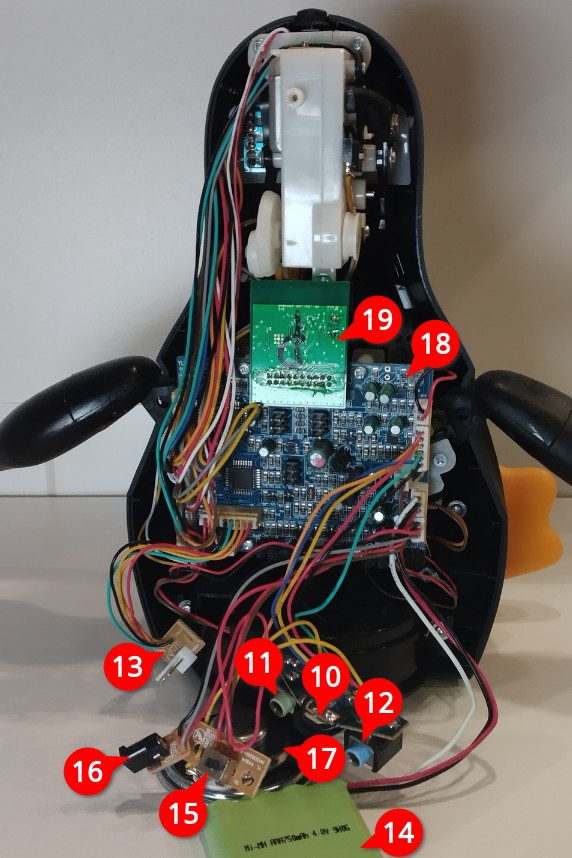
- Replace the wireless dautherboard (item 19) in de TuxDroid with a RPi Nano, ditch the Fish (item 2)
Level 2: Replace the entire “guts”
- Keep the motors, cabling, sensors
- Replace the mainboard (item 18) with modern motor control, replace the built-in battery (item 14) etc…
Level 3: Whatever tickles your fancy
- Interface Tux with ChatGPT and have it sing a lullabuy
- ...
Interested?
Go ahead and play with the TuxDroid!
You may:
- Disassemble, but keep all bits and make sure it can be reassembled
- Solder wires to experiment, but remove them when you’re done for the day
TuxDroid harware overview
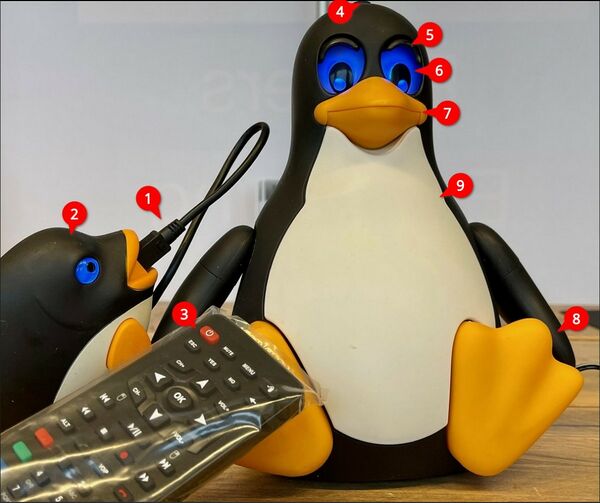
Front
- USB mini cable to connect the Fish to computer
- TuxDroid Fish – to remote control the TuxDroid from your computer
- IR Remote – reciver behind the eye of the TuxDroid
- Button
- Eye lid – can open and close; remotely controlled from computer
- Eye – blue LEDs behind the eye can light up; remotely controlled from computer
- Beak – can open and close; remotely controlled from computer
- Flippers – can move up and down; remotely controlled from computer
- Body – can turn left and right; remotely controlled from computer
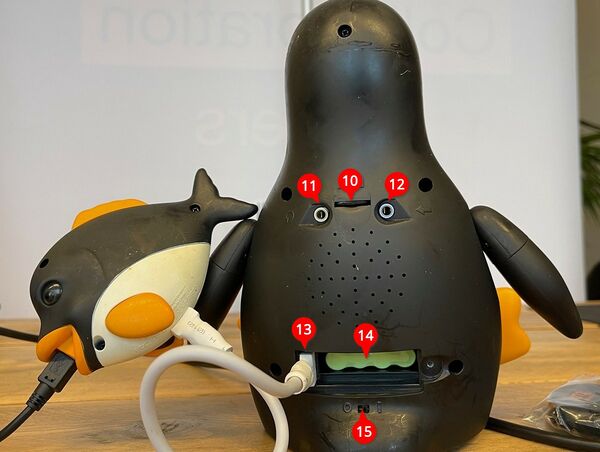
Back
- Volume control of the internal speaker (item 17)
- 3.5mm jack for headphone
- 3.5mm jack for external microphone
- direct connection for firmware upgrade from the Fish
- built-in NiMH battery (4.8V, 750mAh)
- on-off switch for the TuxDroid
- external power jack for the TuxDroid
- built-in speaker
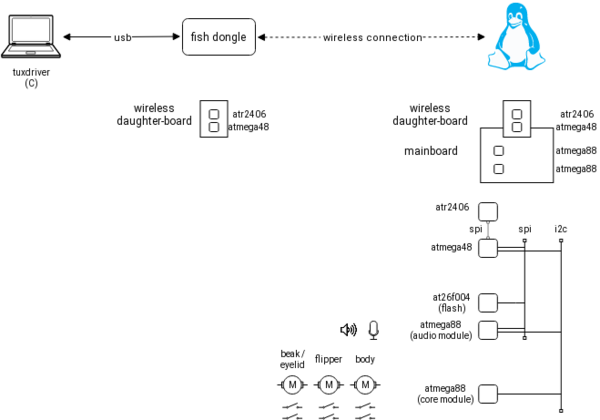
- TuxDroid main board – based on 2x Atmel ATmega88 providing “core” and “audio” modules to controls, e.g.: motor, IR, audio etc functions
- TuxDroid wireless daughter board – based on 1x Atmel ATmega48 and Atmel ATR2406 2.4-GHz ISM Transceiver (the exact same board is also in the TuxDroid Fish)
Schematics
Links
- Lots of code for the TuxDroid: https://github.com/joelmatteotti, e.g.: firmware
- https://www.tuxdroids.com/learn-more/
- Wikipedia article: https://en.wikipedia.org/wiki/Tux_Droid
- YouTube playlist: https://www.youtube.com/playlist?list=PLxZmfh4TBuS1nVkgj2jBe0wveSlaYfPr4&jct=lAHCmPOucB5GfuaPiO9b719vbZe-IQ
