Understanding the SDS011 particle sensor: Difference between revisions
No edit summary |
|||
| (36 intermediate revisions by 3 users not shown) | |||
| Line 1: | Line 1: | ||
== Understanding the SDS011 particle sensor == | |||
The SDS011 is extensively used for citizen science projects when air quality is in doubt. | The SDS011 is extensively used for citizen science projects when air quality is in doubt. | ||
The SDS011 is also the preferred sensor in most citizen science campaigns of governmental initiatives in Germany, The Netherlands and Belgium. For example in the monitoring campaign “de Schone Luchten” [TODO link], the SDS011 plays a central role in gathering date for the public dialogue about dust exhaust of a local steel mill. Within the scientific community as in the groups of concerning citizens there is a growing concern about the the scientific significance of the data collected by the SDS011. [Citation needed] | |||
This article is a log of our findings while opening up the sensor and also a description of the process of understand the physics behind the functioning of the device. | This article is a log of our findings while opening up the sensor and also a description of the process of understand the physics behind the functioning of the device. | ||
Ideally we would like to create firmware that comes with a description of what physical properties of the incoming air it can | |||
measure, and how accurate it could or would be, if all specified pre-conditions are met. | |||
=== Definitions === | |||
PM1 | |||
PM2.5 | |||
PM10 | |||
=== Claims of manufacturer and datasheet === | |||
[TODO] | |||
=== Claims by users of the device === | |||
[TODO] | |||
=== Operation of the SDS011 === | === Operation of the SDS011 === | ||
Scattering particles are detected when being hit by a laser beam. The scatter patterns are picked up by a photo-diode which signal is amplified and then fed to a micro-controller. The micro-controller interprets the data stream and relates it to known properties of representative dust samples. The algorithm behind the this fitting is unknown. | |||
=== Closed Firmware === | === Closed Firmware === | ||
Recently a number of scientific articles appeared that try to assess the validity of the SDS011 sensor. | Recently a number of scientific articles appeared that try to assess the validity of the SDS011 sensor. | ||
However, little is published about the exact physical inner workings of the device, nor on its pre-programmed firmware. Until now researchers take the functioning of the device as a black box | [TODO link them] | ||
However, little is published about the exact physical inner workings of the device, nor on its pre-programmed firmware. | |||
[TODO describe which parts are described] | |||
Until now researchers take the functioning of the device as a black box. Its firmware is considered corporate property and therefore cannot be tinkered with. | |||
To estimate the scientific value of the data gathered by the SDS011, we think that it is important that the working of the device should be open to the public. Therefore we decided to open up the apparatus and investigate its inner workings. | To estimate the scientific value of the data gathered by the SDS011, we think that it is important that the working of the device should be open to the public. Therefore we decided to open up the apparatus and investigate its inner workings. | ||
=== Assumptions made by firmware === | |||
The | == Reverse engineering == | ||
The follow effort needs to be done to get more insights about the pcb board and the sensor. | |||
This info can then be used to feed a physicist with a theoretical model of potential measurements that can be performed with this setup. | |||
=== The board === | === The board === | ||
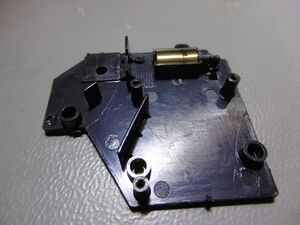
[[File:Optical Chambre SDS011, photo Cmpxchg.jpg|thumb|Part optical chambre]] | |||
To do: | To do: | ||
# Determine the GPO and GPI of the STM32 while processing | # Determine the GPO and GPI of the STM32 while processing | ||
# Measure the control circuit of the laser module. | # Measure the control circuit of the laser module. | ||
# Create a matching circuit, filtering and gain of the instrumentation amplifier | # Create a matching circuit, filtering and gain of the instrumentation amplifier analyzed. | ||
=== The sensor === | === The sensor === | ||
To do: | |||
# Determine type of the photosensor | # Determine type of the photosensor. | ||
# Measure size of size of hole | # Measure size of size of hole under the detection area. | ||
# Create a layout of the lightbox. Angles of second order reflections drawn. | # Create a layout of the lightbox. Angles of second order reflections drawn. | ||
# Measure | # Measure the speed of the airflow. | ||
# Estimate the focus area of laser beam on the airflow. | # Estimate the focus area of laser beam on the airflow. | ||
=== Re-flashing the STM32 === | |||
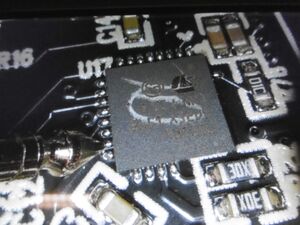
[[File:Cut off pins, photo cmpxchg.jpg|thumb|Pins cut off]] | |||
A complication for re-programming the STM32 is that the programming pins (SWD) are cut off in the manufacturing process, see photo. | A complication for re-programming the STM32 is that the programming pins (SWD) are cut off in the manufacturing process, see photo. | ||
We discerned three possible scenario's for re-flashing the firmware. | We discerned three possible scenario's for re-flashing the firmware. | ||
# | # Reconnecting the copper ends of the cut-off SWD pins | ||
# via the UART, with help from the BootP pin. | # Flashing via the UART, with help from the BootP pin. | ||
# | # Replace the microcontroller on the pcb with a new one, and put an opensource bootloader on it. | ||
== | === Develop "bare-metal" drivers === | ||
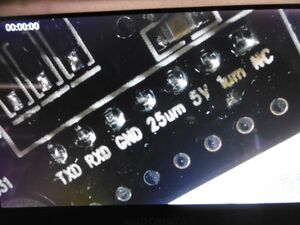
[[File:Connection SDS011, photo Cmpxchg.jpg|thumb|Connections]] | |||
Create bare-metal drivers for: | Create bare-metal drivers for: | ||
# Blink a led, visual debugging | # Blink a led, visual debugging | ||
| Line 65: | Line 78: | ||
The drivers can be tested with short burst of raw measurements, to be output over UART. | The drivers can be tested with short burst of raw measurements, to be output over UART. | ||
The developing of the drivers using a easy to use tool chain needs to be established. | The developing of the drivers using a easy to use tool chain needs to be established. | ||
. | |||
=== Scheduling tasks === | |||
We are not going to use a RTOS. How we are going to schedule tasks is yet to be determined. | |||
== Calibrating == | |||
Not yet decided upon how. Probably using climbing chalk. | |||
== Sources and references == | == Sources and references == | ||
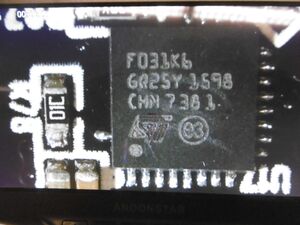
[ | === Microcontroller stm32f031k6 === | ||
[[File:STM32 f031k6.jpg|thumb|F031K6]] | |||
[[Stm32_F031k6_Reference|Stm32 f031k6 reference page]] | |||
Latest revision as of 09:43, 9 March 2020
Understanding the SDS011 particle sensor
The SDS011 is extensively used for citizen science projects when air quality is in doubt.
The SDS011 is also the preferred sensor in most citizen science campaigns of governmental initiatives in Germany, The Netherlands and Belgium. For example in the monitoring campaign “de Schone Luchten” [TODO link], the SDS011 plays a central role in gathering date for the public dialogue about dust exhaust of a local steel mill. Within the scientific community as in the groups of concerning citizens there is a growing concern about the the scientific significance of the data collected by the SDS011. [Citation needed]
This article is a log of our findings while opening up the sensor and also a description of the process of understand the physics behind the functioning of the device.
Ideally we would like to create firmware that comes with a description of what physical properties of the incoming air it can measure, and how accurate it could or would be, if all specified pre-conditions are met.
Definitions
PM1
PM2.5
PM10
Claims of manufacturer and datasheet
[TODO]
Claims by users of the device
[TODO]
Operation of the SDS011
Scattering particles are detected when being hit by a laser beam. The scatter patterns are picked up by a photo-diode which signal is amplified and then fed to a micro-controller. The micro-controller interprets the data stream and relates it to known properties of representative dust samples. The algorithm behind the this fitting is unknown.
Closed Firmware
Recently a number of scientific articles appeared that try to assess the validity of the SDS011 sensor. [TODO link them] However, little is published about the exact physical inner workings of the device, nor on its pre-programmed firmware. [TODO describe which parts are described] Until now researchers take the functioning of the device as a black box. Its firmware is considered corporate property and therefore cannot be tinkered with.
To estimate the scientific value of the data gathered by the SDS011, we think that it is important that the working of the device should be open to the public. Therefore we decided to open up the apparatus and investigate its inner workings.
Assumptions made by firmware
Reverse engineering
The follow effort needs to be done to get more insights about the pcb board and the sensor. This info can then be used to feed a physicist with a theoretical model of potential measurements that can be performed with this setup.
The board

To do:
- Determine the GPO and GPI of the STM32 while processing
- Measure the control circuit of the laser module.
- Create a matching circuit, filtering and gain of the instrumentation amplifier analyzed.
The sensor
To do:
- Determine type of the photosensor.
- Measure size of size of hole under the detection area.
- Create a layout of the lightbox. Angles of second order reflections drawn.
- Measure the speed of the airflow.
- Estimate the focus area of laser beam on the airflow.
Re-flashing the STM32

A complication for re-programming the STM32 is that the programming pins (SWD) are cut off in the manufacturing process, see photo. We discerned three possible scenario's for re-flashing the firmware.
- Reconnecting the copper ends of the cut-off SWD pins
- Flashing via the UART, with help from the BootP pin.
- Replace the microcontroller on the pcb with a new one, and put an opensource bootloader on it.
Develop "bare-metal" drivers

Create bare-metal drivers for:
- Blink a led, visual debugging
- Laser control, PWM
- ADC
- UART
The drivers can be tested with short burst of raw measurements, to be output over UART. The developing of the drivers using a easy to use tool chain needs to be established.
.
Scheduling tasks
We are not going to use a RTOS. How we are going to schedule tasks is yet to be determined.
Calibrating
Not yet decided upon how. Probably using climbing chalk.
Sources and references
Microcontroller stm32f031k6
