Door sign: Difference between revisions
From RevSpace
No edit summary |
|||
| Line 2: | Line 2: | ||
|Name=Door sign | |Name=Door sign | ||
|Status=Completed | |Status=Completed | ||
|Picture= | |Picture=IMG_20180706_174558.jpg | ||
|Contact=User:Gori | |Contact=User:Gori | ||
|Contact1=User:Thomas | |Contact1=User:Thomas | ||
| Line 38: | Line 38: | ||
= Gallery = | = Gallery = | ||
<gallery> | <gallery> | ||
RevspaceignTest.JPG | |||
File:P1010262.JPG | File:P1010262.JPG | ||
File:P1010257.JPG | File:P1010257.JPG | ||
Latest revision as of 15:52, 6 July 2018
| Project Door sign | |
|---|---|

| |
| Status | Completed |
| Contact | User:Gori, User:Thomas |
| Last Update | 2018-07-06 |
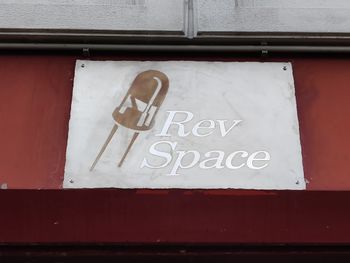
Make a cooler revspace sign for about the door
Finished product
- https://revspace.nl/kiekjes/view/20180702/P1010323.JPG
- https://revspace.nl/kiekjes/view/20180702/P1010322.JPG
Specs
Sign must
- be 600x400 mm or enough to cover the ugly patch above the door
- be securely fastened and removeable
- leave no significant marks on the building
- be awesome
Technical design
- 2mm 304 stainless steel plate, 2B finish
- 2 10x40x2 strips, riveted to the building, with 2x 3mm rvs screws , holing the plate to the building
- Use Vinyl sticker as resist, also sticker the back and edges
- Etch for 2 to 3 hours with 40% FeCl3, in a washing machine leak tray
- Watch out, if vinyl is cut well in advanced, likelihood of edges getting loose increases. This creates uneven edges when etching. Cut right before application!
graphic design
- Logo
- Letters area polished with rvs polishing paste and buffing wheel
- LED area heat treated with RVS wire wheel to get a brushed surface, then heat treated to golder colour
- rest etched


