Difference between revisions of "Vacuumpomp"
Jump to navigation
Jump to search
m |
|||
| (11 intermediate revisions by the same user not shown) | |||
| Line 3: | Line 3: | ||
|Picture= | |Picture= | ||
|Omschrijving= Rebuilding a vacuum pump | |Omschrijving= Rebuilding a vacuum pump | ||
| − | |Status= | + | |Status=In progress |
|Contact=thomas | |Contact=thomas | ||
}} | }} | ||
| Line 24: | Line 24: | ||
Polishedgasketsurfaces.jpg|Freshly polished gasket surfaces of pump main mount and housing | Polishedgasketsurfaces.jpg|Freshly polished gasket surfaces of pump main mount and housing | ||
Shaftsealdriver.jpg|Shaft seal driver. This tool makes it harder to screw up when installing new shaft seals. | Shaftsealdriver.jpg|Shaft seal driver. This tool makes it harder to screw up when installing new shaft seals. | ||
| + | Gas_ballast_seal.jpg|Old gas ballast seal next to its replacement | ||
</gallery> | </gallery> | ||
| − | [https://www.thingiverse.com/thing:4913203 | + | '''Lessons learned so far:''' |
| + | |||
| + | * For those who wish to replace the shaft seals without being extorted by Leybold, they are regular FKM GR 15x24x6.5 SS 304 spring oil seals. Available as a general commodity item. | ||
| + | * Use a special driver to install the new shaft seals. I designed one, you can find the STL [https://www.thingiverse.com/thing:4913203 here]. | ||
| + | * Do not try to replace the gas ballast seal unless absolutely necessary. It is very hard to remove from its deep, blind hole. It also incorporates an internal metal ring, making cutting the seal out impossible. See gallery photo above. It took me three hours to remove it without damaging the seat, with a combination of solvents, a scalpel and a hemostat. Don't be me, leave it be. Reseating the new one is also a major pain in the ass. | ||
| + | * If the vanes seem a bit loose when dry, like they have too much play in the rotor slots and wobble around a bit, don't worry. Once there is an oil film between the vanes and the rotor surfaces, they'll be just fine. | ||
| + | *Find the silencer nozzle on the detailed diagram and unclog that bastard. I am 99% sure this was the cause of the noise that prompted the rebuild. Its job is to inject a tiny bit of air into the second stage vane chamber, to keep it from making excessive noise when the pump reaches final pressure. The orifice is incredibly small. I used a thread from some stranded wire to unclog it. Be careful though, it is made of aluminium for some reason. | ||
Revision as of 22:40, 21 July 2021
| Project Vacuumpomp | |
|---|---|
| Rebuilding a vacuum pump | |
| Status | In progress |
| Contact | thomas |
| Last Update | 2021-07-21 |
Leybold Trivac D8B
We need a roughing pump for our turbos. I bought this unit a while ago, and it works, but it also makes funny noises.
Plan
It needs to be opened up. I may have to fabricate and/or purchase some new parts to get it back to a more usable state.
Teardown / Rebuild
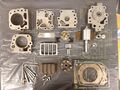
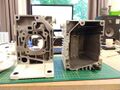
Fully disassembled pump module
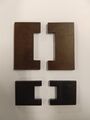
First and second stage vanes
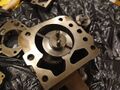
First stage vane in pump module segment
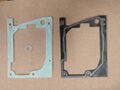
Original busted gasket and temporary laser cut silicone replacement
Freshly polished gasket surfaces of pump main mount and housing
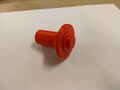
Shaft seal driver. This tool makes it harder to screw up when installing new shaft seals.
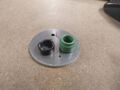
Old gas ballast seal next to its replacement


Lessons learned so far:
- For those who wish to replace the shaft seals without being extorted by Leybold, they are regular FKM GR 15x24x6.5 SS 304 spring oil seals. Available as a general commodity item.
- Use a special driver to install the new shaft seals. I designed one, you can find the STL here.
- Do not try to replace the gas ballast seal unless absolutely necessary. It is very hard to remove from its deep, blind hole. It also incorporates an internal metal ring, making cutting the seal out impossible. See gallery photo above. It took me three hours to remove it without damaging the seat, with a combination of solvents, a scalpel and a hemostat. Don't be me, leave it be. Reseating the new one is also a major pain in the ass.
- If the vanes seem a bit loose when dry, like they have too much play in the rotor slots and wobble around a bit, don't worry. Once there is an oil film between the vanes and the rotor surfaces, they'll be just fine.
- Find the silencer nozzle on the detailed diagram and unclog that bastard. I am 99% sure this was the cause of the noise that prompted the rebuild. Its job is to inject a tiny bit of air into the second stage vane chamber, to keep it from making excessive noise when the pump reaches final pressure. The orifice is incredibly small. I used a thread from some stranded wire to unclog it. Be careful though, it is made of aluminium for some reason.